COMPASS 2
Dealer Security Guide

Compass Dealer Security Guide
2
Compass Dealer Security Guide | March 2022
31-00211-01
©2022 Honeywell
CONTENTS
Welcome to Compass Security ................................................................................................................ 7
Disclaimer ............................................................................................................................................... 7
Introduction and Intended Audience ......................................................................................................... 8
Related security documents ................................................................................................................... 8
System Overview..................................................................................................................................... 9
Design and planning .............................................................................................................................. 11
Physical equipment .............................................................................................................................. 11
Network ............................................................................................................................................... 11
Network configuration and isolation .................................................................................................. 11
Compass web interface access using the Internet............................................................................. 11
Virtual environments............................................................................................................................. 12
Virtual environment recommendations .............................................................................................. 12
Disaster recovery planning ................................................................................................................... 12
Developing a disaster recovery plan ................................................................................................. 13
Backup and recovery strategy........................................................................................................... 13
Installation and configuration ................................................................................................................. 15
Configuring and enabling security for SQL connections ........................................................................ 16
Disable or rename the “sa” Login Account ........................................................................................ 16
Update the SQL Server sa account to the appropriate value for the local environment ...................... 17
Secure the communication network with SQL Server and use a trusted certificate to prevent spoofing
...................................................................................................................................................... 17
Ensure the SQL Server Browser Service is configured correctly........................................................ 21
Regularly backing up and monitoring SQL Server for unauthorized access and unexpected operations
...................................................................................................................................................... 22
Set the CHECK_EXPIRATION option to ON for all SQL authenticated logins within the Sysadmin role
...................................................................................................................................................... 22
Ensure the Scan for Startup Procs Server Configuration option is set to 0 ......................................... 22
Ensure Remote Access Server Configuration Option is set to 0 ........................................................ 22
Configuring and enabling HTTPS ......................................................................................................... 23
Before you begin: implement SSL ..................................................................................................... 23
Selecting a certificate option ............................................................................................................. 23
Users and groups .................................................................................................................................. 29
Creating user profiles ........................................................................................................................... 29

Welcome to Compass Security
31-00211-01
©2022 Honeywell
Compass Dealer Security Guide | March 2022
3
Managing user privileges .................................................................................................................. 29
Using security levels ......................................................................................................................... 29
Using an authorized period ............................................................................................................... 29
Using group memberships ................................................................................................................ 30
Using user accounts to enforce security ............................................................................................ 31
Software and operating system security ................................................................................................. 34
Virus protection ................................................................................................................................ 34
Service packs and security updates .................................................................................................. 35
Service and primary workstation accounts ........................................................................................ 36
Services required by compass .......................................................................................................... 36
SQL Server ...................................................................................................................................... 36
Monitoring and logging services ........................................................................................................... 36
System monitoring ............................................................................................................................ 36
Setting up and analyzing Windows audit logs.................................................................................... 37
Restricting access to event logs........................................................................................................ 37
Networks and firewalls ......................................................................................................................... 38
Network ports and firewall settings.................................................................................................... 38
Configuring the Windows firewall ...................................................................................................... 40
Detecting network intrusion............................................................................................................... 41
Wireless access points ..................................................................................................................... 41
Hardening ............................................................................................................................................ 42
Physical computer ............................................................................................................................ 42
Operating system ............................................................................................................................. 42
System delivery ..................................................................................................................................... 43
Maintenance and decommissioning ....................................................................................................... 44
Appendix: SSL certificate country codes ................................................................................................ 45
Compass installation security checklist .................................................................................................. 48

Compass Dealer Security Guide
4
Compass Dealer Security Guide | March 2022
31-00211-01
©2022 Honeywell
User Agreement And Limited Warranty
IMPORTANT - PURCHASE OF ALERTON PRODUCTS OR USE OF SOFTWARE, FIRMWARE AND / OR
ACCOMPANYING DOCUMENTATION (DEFINED BELOW) IS SUBJECT TO LICENSE RESTRICTIONS AND
LIMITED WARRANTY. CAREFULLY READ THIS AGREEMENT BEFORE USING ALERTON PRODUCTS,
SOFTWARE, FIRMWARE AND/OR DOCUMENTATION.
This is a legal "Agreement," concerning the purchase of Products and use of Software, Firmware and/or
Documentation, between you, the "User" (either individually or as an authorized representative of the company that is
purchasing, has purchased, or is using the Products, Software, Firmware or Documentation) and Honeywell, 715,
Peachtree street NE, Atlanta, GA, 30308 USA. ("Honeywell").
PURCHASE OF ALERTON PRODUCTS OR USE OF SOFTWARE, FIRMWARE AND / OR ACCOMPANYING
DOCUMENTATION INDICATES USER'S COMPLETE AND UNCONDITIONAL ACCEPTANCE OF THE TERMS
AND CONDITIONS SET FORTH IN THIS AGREEMENT.
Honeywell provides Alerton products ("Products"), software programs ("Software"), firmware, e.g., protocols, software
program code, device drivers and related hardware ("Firmware") and accompanying documentation
("Documentation") and grants a non-exclusive and non-transferable license ("License") to User to use the Software
and the Firmware only on the following terms and conditions. Taken together, Products, licensed Software, licensed
Firmware and accompanying Documentation are collectively defined as "Alerton Product(s)" in this Agreement.
1. Copyright. The Software, Firmware and Documentation are copyrighted and protected by United States copyright
laws and international treaty provisions and laws, contain valuable proprietary products, information and trade
secrets, and shall remain the property of Honeywell. User may not and shall not copy or otherwise reproduce or make
available to any other party any part or all of the Software, Firmware or Documentation nor decompile, disassemble,
reverse engineer, manufacture or modify any portion of the Products, Software, Firmware, Documentation or any
portion of the same for any purpose or otherwise attempt to determine the underlying source code of the Software or
Firmware or permit any such action; provided however, User may either (a) make one (1) copy of the Software solely
for backup or archival purposes, or (b) transfer one (1) image of the Software to a single hard disk, CD or other
comparable media, provided User keeps the original solely for backup or archival purposes.
2. License. User is hereby licensed to use one (1) copy of the Software for User's own use in operating the Products.
User may not rent, lease or otherwise assign or transfer all or any part of the Software, Firmware or Documentation.
In addition, User may not sublicense, assign or transfer this License or Agreement, or any part thereof. Any attempt
to do so shall terminate this License and User's right to use the Software and Firmware and shall subject User to
liability for damages to Honeywell. LICENSING TO USER OF THE SOFTWARE AND FIRMWARE COMMENCES
WHEN USER USES THE SOFTWARE, FIRMWARE AND / OR ACCOMPANYING DOCUMENTATION.
3. Copies, Modification or Merger. Except as specifically set forth in Paragraph 1, User may not copy, modify, transfer
all or any portion of the Software, Firmware or Documentation or merge it or them into another program, unless
expressly authorized in advance in writing by Honeywell. User must, as a condition of this License, reproduce and
include the identifying marks, copyright and proprietary notices on any permitted copy of the Software, Firmware and
Documentation. "Copies" shall include, without limitation, any complete or partial duplication on any media,
adaptations, translations, compilations, partial copies within modifications, mergers with other material from whatever
source and updated works. User will use its best efforts to prevent any unauthorized copying or other activity with
respect to the Software, Firmware and Documentation.
4. Third-Party Beneficiary. For any software or other technology under this Agreement licensed by Honeywell from
Microsoft (or other licensors, Microsoft or the applicable licensor is a third party beneficiary of this Agreement with the
right to enforce the obligations set forth in this Agreement.
5. Warranty. Honeywell warrants Honeywell manufactured or produced Alerton Products to be materially free from
defects and to substantially conform to Honeywell's published specifications for a period of twenty-four (24) months
from date of shipment from Honeywell (the "Product Warranty Period"). This entire Section 5 is defined as the
"Warranty."

Welcome to Compass Security
31-00211-01
©2022 Honeywell
Compass Dealer Security Guide | March 2022
5
Honeywell also warrants Alerton Products that it has previously repaired or replaced for the greater of ninety (90)
days from the date of their shipment from Honeywell or the remainder of the Product Warranty Period of the originally
shipped Alerton Product (the "Repair/Replacement Warranty Period"). During the Product Warranty or
Repair/Replacement Warranty Period, Honeywell will repair or replace the applicable Alerton Products without charge
and will add applicable engineering changes and upgrades. This Warranty only applies to defective materials and
workmanship of Alerton Products and excludes defects that result from misuse, neglect, improper installation,
unauthorized repair or alteration, damage during or after shipping, accident and/or misapplication of such products.
This Warranty does not apply to parts, equipment, software, firmware, components, documentation or any other item
that Honeywell does not manufacture or produce. This Warranty is also voided by removal or alteration of Alerton
Product identification labels. Honeywell's sole responsibility with respect to Alerton Products shall be, within the
applicable Product Warranty Period, to furnish a replacement Alerton Product (FOB factory) or, at the option of
Honeywell, to repair and return (FOB Factory) the defective Alerton Product. HONEYWELL HEREBY EXCLUDES
ALL IMPLIED WARRANTIES OF MERCHANTABILITY AND FITNESS FOR A PARTICULAR PURPOSE AND ALL
OTHER EXPRESS OR IMPLIED WARRANTIES WHATSOEVER WITH RESPECT TO ALERTON PRODUCTS. In
no event shall Honeywell be liable for personal injury, loss of profit, loss of production, loss of business or goodwill,
business interruption, loss of business information or data, loss due to delays, any other pecuniary loss, any cost or
liability of Users or any other parties, to themselves or to others, increased or uncovered operating or fixed costs,
inefficiency, or any other special, exemplary, consequential, incidental, indirect or remote damages in any manner,
directly or indirectly, related to design, manufacturing, supply, installation or use of, or inability to use, Alerton
Products, or any other act or failure to act by Honeywell or its agents or contractors. HONEYWELL MAKES NO
CLAIMS OR WARRANTIES WITH RESPECT TO THE SOFTWARE OR THE FIRMWARE AND SPECIFICALLY
DISCLAIMS ANY IMPLIED WARRANTIES OF MERCHANTABILITY OR FITNESS FOR A PARTICULAR PURPOSE
AND EXPRESS OR IMPLIED WARRANTIES THAT THE OPERATION OF THE SOFTWARE OR FIRMWARE OR
ANY PORTION THEREOF WILL BE INTERRUPTION OR ERROR FREE. Notwithstanding anything to the contrary
contained in this Warranty, Honeywell shall not be liable to Users or any other parties for any damages, including, but
not limited to consequential, incidental, indirect, special, exemplary remote or pecuniary damages and any stated or
express warranties set forth in this warranty are in lieu of all obligations or liability for any damages arising out of or in
connection with the use or performance of, or inability to use, Alerton Products and the licensed Software and
Firmware.
User's exclusive remedy and Honeywell's entire liability arising from or in connection with the Alerton Products,
Software, Firmware, Documentation and/or this License and Agreement (including, without limitation, any breach of
any warranty, express or implied) shall be, at Honeywell's option, the repair or replacement of the Products or
Software or Firmware as applicable, as stated above. ACCORDINGLY, HONEYWELL AND ITS DESIGNATED
DEALERS AND THEIR DESIGNATED ASSOCIATE DEALERS HAVE EXCLUDED AND DISCLAIM ANY AND ALL
IMPLIED WARRANTIES OF MERCHANTABILITY OR FITNESS FOR A PARTICULAR PURPOSE AND ALL OTHER
WARRANTIES, EXPRESS OR IMPLIED, WHATSOEVER, WITH RESPECT TO THE PRODUCTS, THE
SOFTWARE, THE FIRMWARE, THE DOCUMENTATION AND/OR THE LICENSE. USER HEREBY
ACKNOWLEDGES THE SAME.
6. Remedies of Honeywell. IF USER BREACHES THIS AGREEMENT, USER'S LICENSE HEREUNDER SHALL BE
AUTOMATICALLY TERMINATED. Upon termination, User shall return the Software, Firmware and all
Documentation to Honeywell and destroy any copies of the Software, Firmware and the Documentation or any
portions thereof which have not been returned to Honeywell, including copies resident on electronic or digital media.
If User breaches this Agreement, Honeywell shall be entitled to all damages suffered by Honeywell resulting from
such breach and Honeywell shall be entitled to equitable and injunctive relief in addition to all other remedies at law.
In this regard, User acknowledges that its breach of any provision of this Agreement will cause Honeywell immediate
and irreparable injury for which there are inadequate remedies at law. The prevailing party in any dispute concerning
this Agreement shall be entitled to the costs of collection and enforcement, including but not limited to reasonable
attorneys' fees, court costs and all necessary expenses, regardless of whether litigation is commenced.
7. Export. Alerton Products are subject to regulation by local laws and United States government agencies, which
prohibit export or diversion of certain products, information about the products, and direct products of the products to
certain countries and certain persons. User agrees that User will not export in any manner any Alerton Product or

Compass Dealer Security Guide
6
Compass Dealer Security Guide | March 2022
31-00211-01
©2022 Honeywell
direct product of Alerton Product, without first obtaining all necessary approval from appropriate local and United
States government agencies.
8. RESTRICTED RIGHTS NOTICE. Alerton Products, Software, Firmware and Documentation have been developed
entirely at private expense and are commercially provided with RESTRICTED RIGHTS. Use, duplication or disclosure
by the U.S. Government or a U.S. Government subcontractor is subject to the restrictions pursuant to DFARS
227.72013 (October 1988) and DFARS 52.227-19 (June 1987), as amended and as applicable. Manufacturer,
licensor and publisher is Honeywell, 715, Peachtree street NE, Atlanta, GA, 30308 USA.
9. Statute of Limitations. No action for any breach of a warranty, if any, deemed or actual, may be commenced more
than one (1) year following the expiration of such warranty.
10. Other. User further agrees that this Agreement is the complete and exclusive statement of the agreement
between User and Honeywell and supersedes any proposal or prior agreement or any other communications
between Honeywell or any of its representatives and User relating to the use of the Software, Firmware,
Documentation and purchase of the Products. This Agreement may only be modified by a physically signed writing
between User and Honeywell. Waiver of terms or excuse of breach must be in writing and shall not constitute
subsequent consent, waiver or excuse. If any provision of this Agreement is finally determined to be unenforceable,
the remaining provisions shall remain in effect. The laws of the State of Washington and the United States, including
U.S. copyright laws, shall govern this Agreement. Venue in the event of any suit, proceeding or claim shall be in the
courts located in Snohomish County, Washington, USA. If User has any questions regarding this Agreement, User
may contact Honeywell by writing Honeywell at the above address.
This Agreement shall inure to the benefit of and be binding upon the parties and their successors, administrators,
heirs and permitted assigns. Notwithstanding any termination of this Agreement and not in limitation of any other
provision of this Agreement, User shall specifically continue to be fully obligated to comply with all of the requirements
of paragraphs one (1) through four (4), as if the Agreement were not terminated and all remedy provisions hereunder
shall apply to any breach of such obligations.

Welcome to Compass Security
31-00211-01
©2022 Honeywell
Compass Dealer Security Guide | March 2022
7
WELCOME TO COMPASS SECURITY
Welcome to Compass, Alerton’s operator workstation software for building automation systems.
Compass is your command and control center for facility operations from HVAC equipment to
irrigation, lighting, security, and more. Here, you can view and command site equipment and
systems with unprecedented flexibility and power.
DISCLAIMER
While we have engaged in efforts to assure the accuracy of this document, Alerton is not
responsible for damages of any kind, including without limitations consequential damages
arising from the application or use of the information contained herein. Information and
specifications published here are current as of the date of this publication and are subject to
change without notice. The latest product specifications can be found on our website or by
contacting our corporate office in Atlanta, Georgia.
Alerton
715, Peachtree street NE,
Atlanta, GA,
30308 USA
tech.support@alerton.com
Compass Dealer Security Guide
8
Compass Dealer Security Guide | March 2022
31-00211-01
©2022 Honeywell
Introduction and Intended Audience
This manual contains information to guide Alerton dealers on how to securely install and
configure Compass. Security-related information on operation, maintenance, and
decommissioning of Compass can be found in the Compass End-User Security Guide (31-
00212).
Please take the time to read and understand all relevant installation, configuration, and
operation manuals and ensure that you regularly obtain the latest versions.
Related security documents
The following diagram shows the relationships and current state of the other Ascent security
manuals.
Document
Description
Compass Dealer Security
Guide
(31-00211)
Provides security-related instructions for planning, installing, and configuring
a Compass system. The intended audience is an Alerton dealer.
Compass End-User Security
Guide
(31-00212)
Provides security-related instructions for maintaining and decommissioning a
Compass system. The intended audience is the Compass system owner and
end-user.
ACM Dealer Security Guide
(31-00213)
Provides security-related instructions for planning, installing, and configuring
an ACM. The intended audience is an Alerton dealer.
ACM End-User Security Guide
(31-00214)
Provides security-related instructions for maintaining and decommissioning
an ACM. The intended audience is the Compass system owner and end-
user.
System Overview
31-00211-01
©2022 Honeywell
Compass Dealer Security Guide | March 2022
9
SYSTEM OVERVIEW
The following is a diagram of a typical Ascent system installation.
The key elements of the diagram are:
Internet/intranet/corporate network: This is a simplified, logical network representation of
all networks outside of the building automation system (BAS) scope. It may provide access
to the BAS management interfaces (e.g. the Compass primary workstation web user

Compass Dealer Security Guide
10
Compass Dealer Security Guide | March 2022
31-00211-01
©2022 Honeywell
interface) but must provide access to the Internet so that Compass computers can check for
and download operating system and virus scanner updates unless another means to do this
is provided.
BAS network: This network is used solely for BAS protocols, which consists of BACnet/IP,
BACnet/Ethernet, and any protocols that Niagara Integration Services on an ACM might
use. This network must not be the same network as the Internet/intranet/corporate network.
BAS firewall: To provide additional separation and protection to the BAS, a firewall must be
used between the Internet/intranet/corporate network and any BAS device that connects to
it, such as the Compass primary workstation, Compass workstations, and ACMs. This
firewall limits access to the BAS to only computers that are authorized and may help reduce
the risk of attacks, such as a denial-of-service attack.
Compass primary workstation: The Compass primary workstation is a computer running
Compass software. It requires two network connections – one for connecting to the
management web user interface through a web browser (usually on the
Internet/intranet/corporate network) and another for connecting to the BAS network.
Web browser: Compass software provides a web-based management interface that is
accessed through a web browser.
ACM and BCMs: The Alerton Control Module (ACM) and BACtalk Control Modules (BCMs)
are global controllers that connect to an Ethernet network and host MS/TP network
segments. MS/TP is a low-bandwidth connection that is used to connect controllers and
sensors.
• ACM Niagara Integration Services: The ACM has an instance of Niagara and so it can run
Niagara code, including a web server. If this functionality is used, then connect the ACM’s
second network to the Internet/intranet/corporate network through the BAS firewall.
Compass workstation (optional): If access to the Compass primary workstation’s thick
client interface is not allowed, for example, the Compass primary workstation is run in a
virtual machine or console access to it is not allowed, then install a Compass workstation on
a separate computer to access thick client functionality.
VIP & VXIO: The Alerton VisualLogic IP Controller (VIP) is a BACnet Advanced Application
Controller (B-AAC) with a real-time clock, high resolution 16-bit universal inputs and outputs,
and a 32-bit processor.
VLX, VLC, or EXP: The Alerton controllers are advanced application controller with a high-
resolution converter and new, high performance processor and real-time clock that supports
its own schedules, trendlogs and alarms. The controllers include monitored on-board Hand-
Off-Auto (HOA) switches, Ethernet or MS/TP connectivity, and additional math functions
beyond the standard VLC/VAV controllers.
SQL Server (optional): Compass software can be configured to use an external SQL
Server.

Design and planning
31-00211-01
©2022 Honeywell
Compass Dealer Security Guide | March 2022
11
DESIGN AND PLANNING
This section includes information for designing and planning a secure Compass installation.
Physical equipment
It is essential to discuss physical security of system components with your customer when
planning a system installation. This discussion should assess the security needs of the
system as well as the requirements of the system owner and provide suggestions for best
practices if the system owner does not have requirements of their own.
Controlling physical access to Compass primary workstations, client workstations,
controllers, and network equipment is a fundamental security control that must be
implemented on all installations. This can range from locating the Compass primary
workstation and global controllers in locked rooms or cabinets to using an active access
control system that logs access. (As for any log, an access log is only effective if it is
monitored and audited regularly.)
Network
This section describes recommendations for designing and planning a secure network
configuration.
Network configuration and isolation
BAS (BACnet) devices must be installed on a separate, isolated network and be kept
separate from other networks in the building. This network may be a separate physical
network or a separate logical (e.g. VLAN) network.
The Compass primary workstation and client workstations must have separate network
interfaces for the BAS network and any other network for which they need to connect. For
example, if web browsers on the corporate or intranet network need to connect to the
Compass web user interface, then the Compass primary workstation must have two network
interfaces, one for the BAS network and one for the corporate network.
Network designs must include a firewall to separate and protect the Compass primary
workstation, Compass client workstations, and the BAS network from other networks at the
installation site, including the intranet or corporate network. See “Networks and firewalls” for
more details.
Always run the Compass web server in HTTPS mode with a proper certificate, even if it is
only accessed on a private network, such as a corporate network or intranet.
Compass web interface access using the Internet
Access to the Compass web user interface using the Internet may be done using a Virtual
Private Network (VPN) or by direct access.

Compass Dealer Security Guide
12
Compass Dealer Security Guide | March 2022
31-00211-01
©2022 Honeywell
Virtual private network (VPN)
VPNs provide an additional layer of security controls for accessing the Compass primary
workstation and may already be implemented at a site.
As a dealer, you may choose to provide a VPN solution to your customers that do not
already have one. Choosing a VPN solution and ensuring it is properly configured is out of
the scope of this document.
Direct Internet access
Allowing direct access to the Compass web user interface using the Internet has the benefit
of providing system access to any web browser. The drawback is that there is no extra
security layer to limit attack opportunities. You should discuss this with your customer, so
they understand the implications. For example, you can access your bank using the Internet,
but banks have large security organizations to counter attacks. Is your customer able and
committed to monitoring and keeping Compass updated in order to keep this interface
secure? If direct access is allowed, the following measures must be implemented:
• Configure Compass to use HTTPS with a certificate issued by a trusted certificate authority.
• Put a firewall between the Internet and the Compass primary workstation and only allow the
web user interface port through (port 443 for HTTPS).
Virtual environments
This section describes considerations for installing and hosting the Compass workstation in
this environment. Compass has been tested to work on VMware vSphere. Compass has not
been tested on other virtual infrastructure, such as Hyper-V, Virtual PC, or Virtual Box.
Virtual environment recommendations
Use two network interface cards, one for the BACnet network and one for the intranet
connection. This is consistent with the network configuration for a non-virtual installation.
Disaster recovery planning
This section describes considerations for creating and maintaining a backup and restore
policy for Compass software and its database.
It is essential that every Compass installation have a disaster recovery plan so that the
system can be restored in the event of a security breach or equipment failure. As a dealer,
you should educate the customer about the need for a disaster recovery plan that fully
documents the current configuration of the system, how to check if the configuration has
changed, the process for updating the documentation, and the process and frequency of
verifying backups and audit logs. The amount of documentation and frequency of the checks
and updates depends on customer needs. For example, a customer subject to FDA-
regulations will require much more comprehensive documentation about Compass, server,
network, and supporting software than a system installed in a small, stand-alone building.

Design and planning
31-00211-01
©2022 Honeywell
Compass Dealer Security Guide | March 2022
13
You may help the customer develop their plan, provide a standard plan that can be tweaked
based on the customer’s needs, or provide services to help implement and maintain the
plan. If you help create this plan, then ensure that you clearly document the procedures,
who is responsible for the various activities (dealer or customer) and review this
documentation with the customer when you turn the system over. If you have a support
contract with your customer, then help ensure that the plan is being followed by checking in
regularly. For example, check use of the plan when you perform other maintenance, install
Compass upgrades, or on a quarterly schedule.
Developing a disaster recovery plan
As part of your security strategy, define a comprehensive backup and restore policy for
disaster recovery. In formulating this policy, consider:
• How quickly data or the system needs to be restored. This will indicate the need for a
redundant system, spare offline computer, or file system backup.
• How long data needs to be kept.
• The frequency of changes to critical data and configuration settings. This will dictate the
frequency and scope of backups.
• Safe onsite and offsite storage options for full and incremental backups.
• Safe storage of all Microsoft operating system and Compass installation media, license
keys, and configuration information.
• Who will be responsible for creating backups and the testing, storage, and restoration of
backup files.
Backup and recovery strategy
Performing backups is one of the most important risk mitigation tasks for securing your
Compass system. If backups of important data are not made, then the data will be lost if a
hardware or software failure occurs, if configuration files are deleted, if the system is
infected with a virus or worm, or in the event of a natural disaster like fire or flood.
Choosing an appropriate backup strategy allows you to minimize downtime due to situations
that cause loss of data. When determining your backup strategy, consider the types of
situations that can occur:
• Media failure: If one or more disk drives fail, there is a potential for a complete loss of data
unless the system was properly backed up.
• User error: If a user makes invalid modifications to configuration data, an effective way to
undo these changes are to restore the data from backup.
• Permanent loss of a server: If a server becomes permanently unusable, the system and data
have to be reconstructed unless you have a backup.

Compass Dealer Security Guide
14
Compass Dealer Security Guide | March 2022
31-00211-01
©2022 Honeywell
• Virus or worm infection: If a virus infects the Compass workstation, it could delete or corrupt
files making it difficult or impossible to restore system configuration.
Also consider:
• CD and DVD are not considered reliable backup mediums.
• Backups can be CPU- and disk-intensive operations on a large system. Perform backups at
times that do not have a heavy system load.
• Do not store backup images on a Compass primary workstation or, if used, the SQL Server
computer.
• Do not store backup images on the same computer being backed up.
• Do not store backup images on network drives.
• If network drives are not available, store backup images to a connected drive using USB.
• Not all backup products support backing up SQL Server, especially when SQL Server is
running with open files.
• Configure your backup software product to do a full backup weekly and incremental backup
nightly to lower the load and performance impact from backup activities.
• After the backup has completed, verify that the data was backed up correctly.
Virtual machine environment considerations:
• If Compass is running in a virtual machine, ensure that the virtual machine and the host
environment is covered in the backup and recovery strategy.
• Taking snapshots is not a sufficient method for making virtual machine backups.
Installation and configuration
31-00211-01
©2022 Honeywell
Compass Dealer Security Guide | March 2022
15
INSTALLATION AND CONFIGURATION
There are two workflows available for compass installation:
1. With Internet connection
2. Without Internet connection
With Internet Connection
This is the recommended workflow where Compass is going to be installed while connected
to the Internet during the installation process. This will allow the Compass Installer to
download the prerequisites if they are not available as part of the OS installation.
Without Internet Connection
The secondary workflow should only be used by secure facilities where the Compass
system is not connected to the Internet directly. For this type of workflow, the pre-requisites
need to be manually installed prior to running the Compass Installer.
Before Installing the Compass for Windows Server 2012 R2 and Windows Server 2016, user
should follow the necessary prerequisites for offline instructions as given below:
Windows Server 2012 R2
Microsoft.NET Framework 3.5
This can be enabled using the built-in Server Manager application
Microsoft.NET Framework 4.6.2
https://www.microsoft.com/en-us/download/details.aspx?id=53344
Visual C++ Redistributable for
Visual Studio 2015
https://www.microsoft.com/en-us/download/details.aspx?id=53587
NOTE: Choose vc_redist.x64.exe
Windows Server 2016
Microsoft.NET Framework 3.5
This can be enabled using the built-in Server Manager application
Visual C++ Redistributable for
Visual Studio 2015
https://www.microsoft.com/en-us/download/details.aspx?id=53587
NOTE: Choose vc_redist.x64.exe
Windows Server 2019
Microsoft.NET Framework 3.5
This can be enabled using the built-in Server Manager application
Visual C++ Redistributable for
Visual Studio 2015
https://www.microsoft.com/en-us/download/details.aspx?id=53587
NOTE: Choose vc_redist.x64.exe
NOTE: Run windows update after installing these prerequisites to make sure that the latest
patches have been applied.

Compass Dealer Security Guide
16
Compass Dealer Security Guide | March 2022
31-00211-01
©2022 Honeywell
This section includes information for securely installing and configuring the Compass server
(primary workstation). After Compass is installed, perform the following steps:
1. Configure and enable security for SQL connections.
2. Configure and enable HTTPS.
Configuring and enabling security for SQL connections
The Compass primary workstation (server) requires Microsoft SQL Server for both
conventional and enterprise database types. Enabling security for SQL connections helps
protect the integrity and confidentiality of the database between Compass and its SQL
server.
When Compass is configured to use SQL Server, it is critical for Compass’s operation that
proper steps be taken to ensure its reliability and security. Ensure the following:
• Physical access to the SQL Server computer is controlled.
• User accounts are properly configured.
• The “sa” Login Account has been renamed and/or disabled.
• The SQL Server sa account is updated to the appropriate value for the local environment.
• The operating system and SQL Server Service Packs and Hotfixes are up-to-date.
• Secure the communication network with SQL Server and use a trusted certificate to prevent
spoofing (Configure TLS).
• The SQL Server Browser Service is configured correctly.
• The SQL Server is regularly backed up and monitored for unauthorized access and
unexpected operations.
• Set the CHECK_EXPIRATION option to ON for all SQL authenticated logins within the
Sysadmin role.
• Set SQL Server Audit' to capture both failed and successful logins -
SUCCESSFUL_LOGIN_GROUP.
• Ensure the Scan for Startup Procs Server Configuration option is set to 0.
• Ensure Remote Access Server Configuration Option is set to 0.
Disable or rename the “sa” Login Account
The sa account is a widely known and often used SQL Server account with sysadmin
privileges. This is the original login created during installation and it always has
principal_id=1and sid=0x01. Enforcing this control reduces the probability of an attacker
executing brute force attacks against a well-known principal.
Installation and configuration
31-00211-01
©2022 Honeywell
Compass Dealer Security Guide | March 2022
17
Update the SQL Server sa account to the appropriate value for the local
environment
Update the SQL Server sa account to the appropriate value for the local environment. Ensure
“SQL Server Audit” is set to capture both failed and successful login attempts -
AUDIT_CHANGE_GROUP. SQL Server Audit is capable of capturing both failed and
successful logins and writing them to one of three places: the application event log, the
security event log, and the file system. Compass will use it to capture any login attempt to
SQL Server, as well as any attempts to change audit policy. This is also a second source to
record failed login attempts.
Using Audit instead of the traditional setting on the Security tab to capture successful login
attempts reduces noise in the ERRORLOG. This keeps it smaller and easier to read for DBAs
who are attempting to troubleshoot issues with the SQL Server. Also, the Audit object can
write to the security event log, though this requires operating system configuration. This gives
an additional option for where to store login events, especially in conjunction with an SIEM.
Secure the communication network with SQL Server and use a trusted certificate
to prevent spoofing
Configuring TLS for SQL Server:
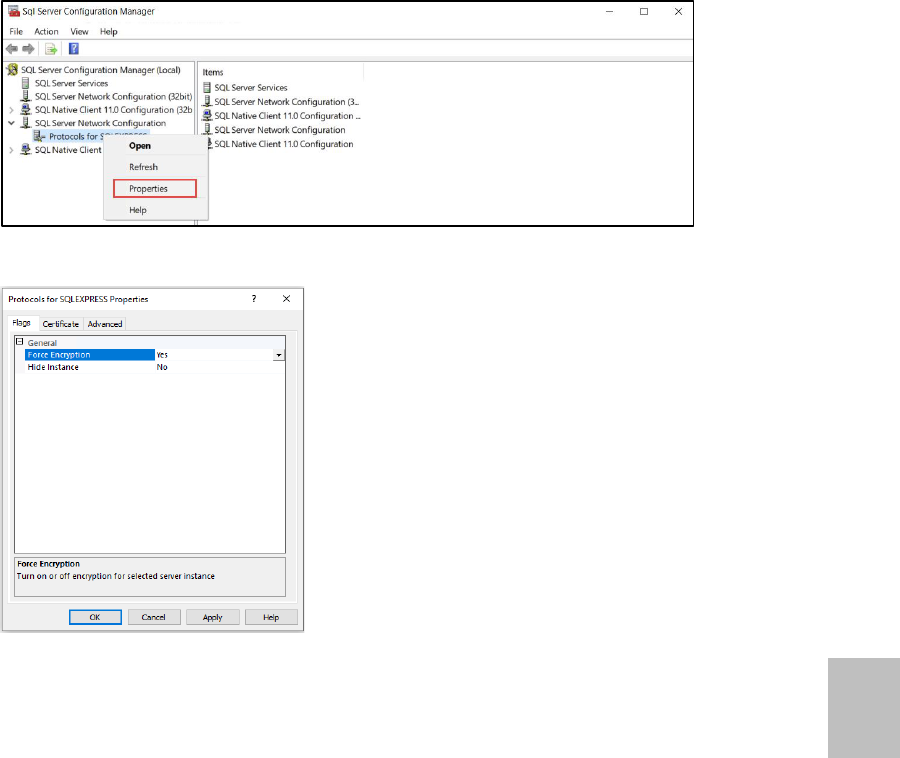
1. Start SQL Server 2019 Configuration Manager.
2. Right-click and then click Properties.
Compass Dealer Security Guide
18
Compass Dealer Security Guide | March 2022
31-00211-01
©2022 Honeywell
3. Click Flags and change Force Encryption from No to Yes.
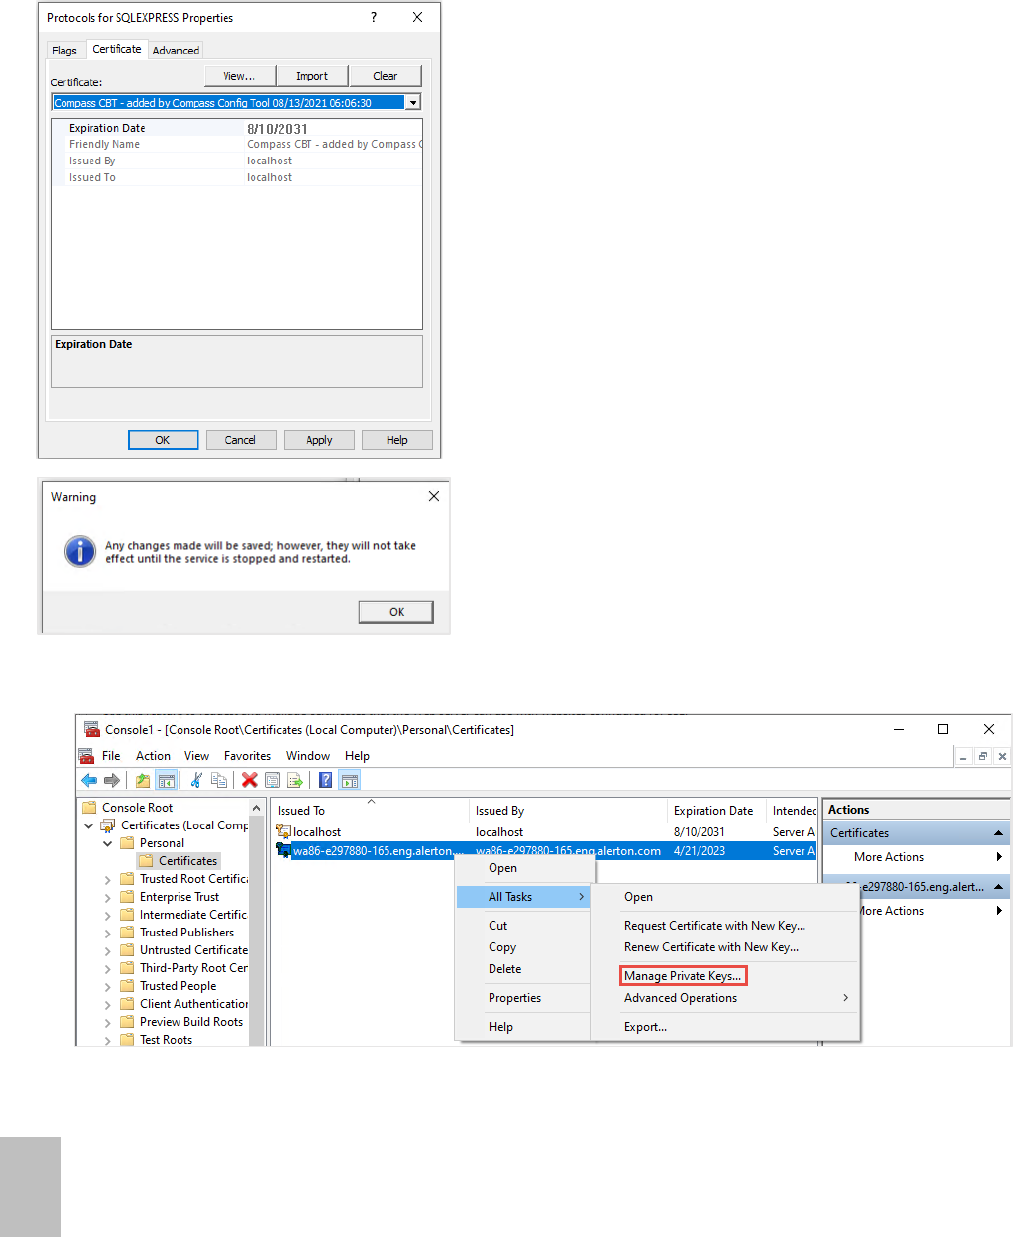
4. Click Certificates, select the appropriate certificate from the drop-down list, and then
click Apply.
5. In MMC select Certificates, highlight and right-click the desired certificate, and then
select All Tasks> Manage Private Keys.
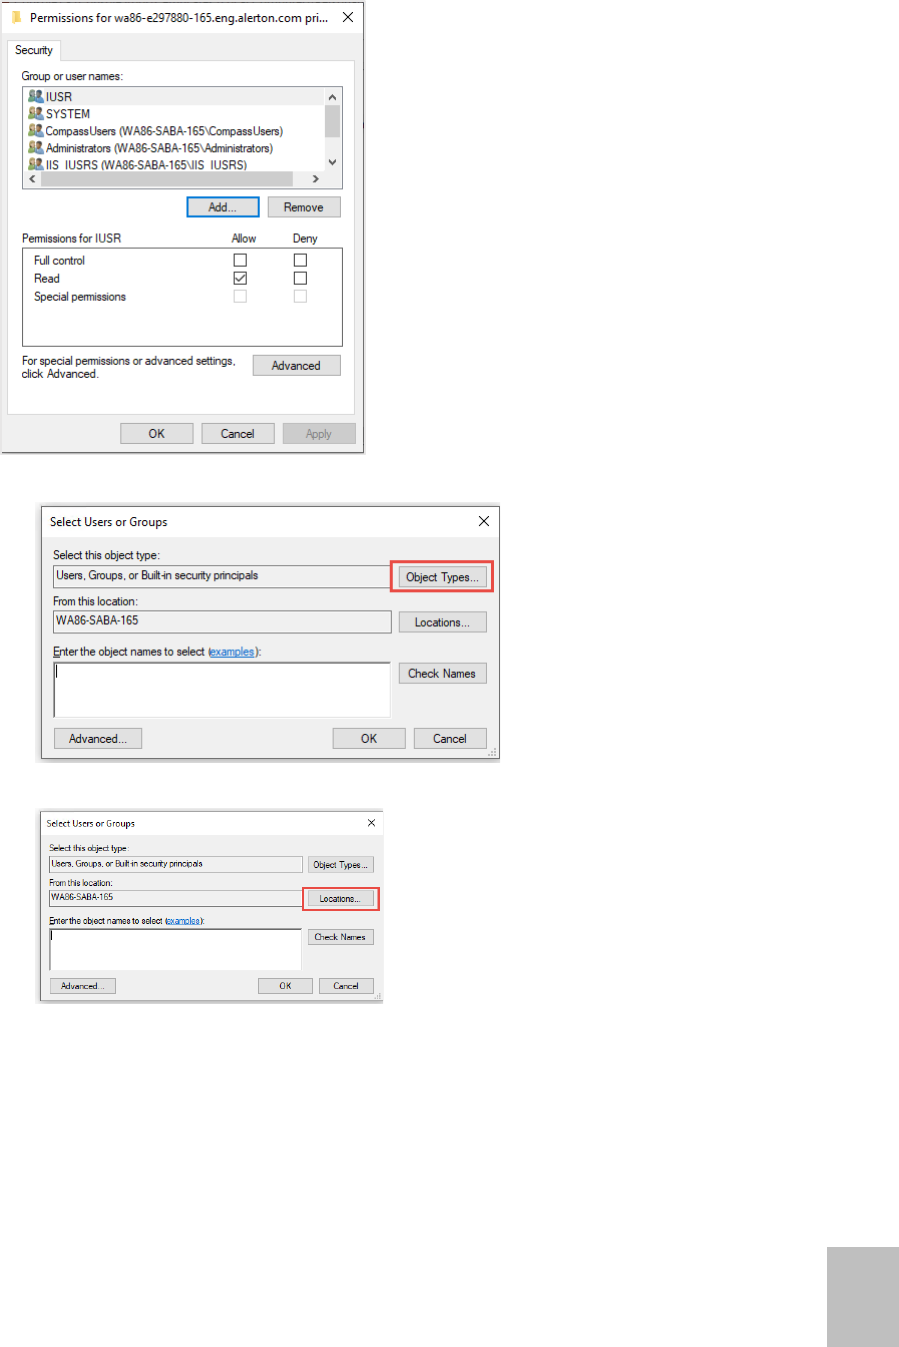
6. Click Add, to select user or group window.
Installation and configuration
31-00211-01
©2022 Honeywell
Compass Dealer Security Guide | March 2022
19
7. Click Object Type in Select Users or Groups window, to select object type.
8. Click Location in Select Users or Groups window, to select Location.
9. Enter the object name of the local computer and click Check Names.
To find the object name click SQL Services in SQL Server Configuration Manager Nav
tree. Refer Screen shot shown below.

Compass Dealer Security Guide
20
Compass Dealer Security Guide | March 2022
31-00211-01
©2022 Honeywell
10. Right-click SQL Server, and then click Restart.
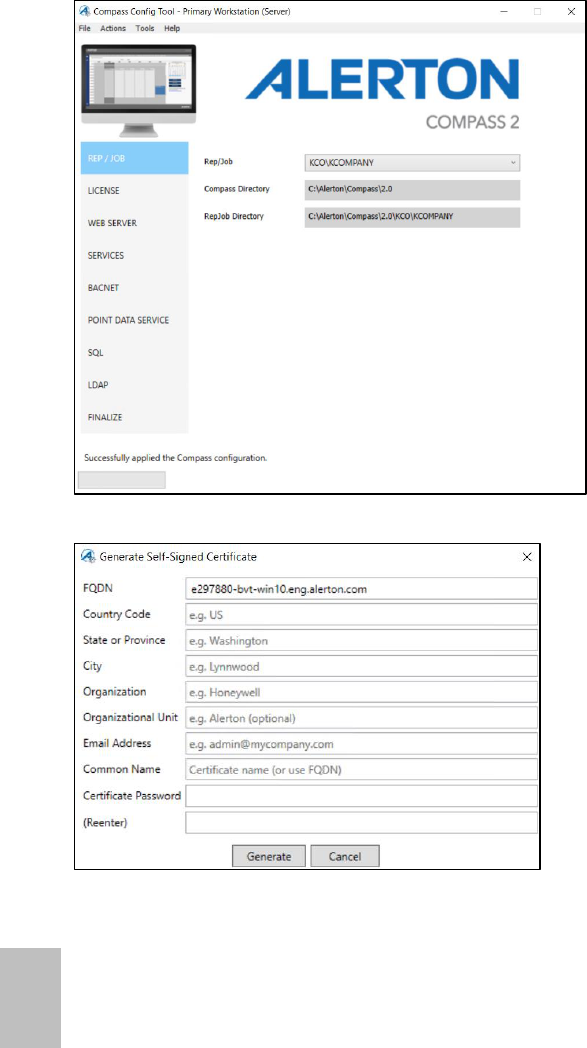
11. Navigate to Config Tool and Click SQL.

Installation and configuration
31-00211-01
©2022 Honeywell
Compass Dealer Security Guide | March 2022
21
12. perform the following actions in SQL Tab:
a) Select Compass Database license type. Enter SQL Server Name and Database
Name.
Click Use SSL Encryption as per the requirement.
NOTE: Ensure Rep/Job is created.
b) Select SQL account with Admin privileges on the compass database.
c) Select Database Authentication.
User can select Window or SQL Authentication.
d) Click Browse in Database Archive Settings section, to set Archive Path.
e) Click Test Connection.
If connection is successful, then database is opened.
f) Click Apply, to complete SQL Server Settings.
Ensure the SQL Server Browser Service is configured correctly
For a default instance installation, SQL Server Browser Service is disabled by default.
Unless there is a named instance on the same server, there typically is no reason for the

Compass Dealer Security Guide
22
Compass Dealer Security Guide | March 2022
31-00211-01
©2022 Honeywell
SQL Server Browser Service to be running. Alerton recommends disabling the SQL Server
Browser Service.
Regularly backing up and monitoring SQL Server for unauthorized access and
unexpected operations
If using SQL Server, enable SSL encryption for communication between the Compass
workstation and the SQL Server database server as described in Compass online Help.
Open Help and then search for “Enterprise Database Configuration.”
For information on how to enable SSL on SQL Server, see Encrypting Connections to SQL
Server on Microsoft’s TechNet at http://technet.microsoft.com/en-us/library/ms189067.aspx.
Set the CHECK_EXPIRATION option to ON for all SQL authenticated logins within
the Sysadmin role
This applies the same password expiration policy used in Windows to passwords used
inside SQL Server. Ensuring SQL logins comply with the secure password policy applied by
the Windows Server Benchmark will ensure that the passwords for SQL authenticated logins
with sysadmin privileges are changed on a frequent basis to help prevent compromise using
a brute force attack. CONTROL SERVER is an equivalent permission to sysadmin and
logins with that permission should also be required to have expiring passwords.
Ensure the Scan for Startup Procs Server Configuration option is set to 0
The scan for startup procs option, if enabled, causes SQL Server to scan for and
automatically run all stored procedures that are set to execute upon service startup.
Enforcing this control reduces the threat of an entity leveraging these facilities for malicious
purposes.
Ensure Remote Access Server Configuration Option is set to 0
The remote access option controls the execution of local stored procedures on remote
servers or remote stored procedures on local server. Functionality can be abused to launch
a Denial-of-Service (DoS) attack on remote servers by off-loading query processing to a
target.

Installation and configuration
31-00211-01
©2022 Honeywell
Compass Dealer Security Guide | March 2022
23
Configuring and enabling HTTPS
IMPORTANT! These instructions have changed significantly for Compass 1.6.0.1.
Over the past few years, web browsers have become more proactive in warning users when
accessing sites that do not follow current best-practices for web security, for example, by
warning against putting user credentials into an HTTP-only page or by prohibiting or
requiring extra steps to connect to an HTTPS site with a self-signed certificate. Configuring
and enabling HTTPS on the Compass server helps protect the integrity and confidentiality of
the data between web browsers and the Compass web server.
Before you begin: implement SSL
Consult with your customer’s IT department to determine if there are any policies or
practices that are applicable to the Compass system. Some IT departments have their own
certificate management systems that can provide a suitable certificate.
Select a certificate authority (CA) and familiarize yourself with their certificate issuing
process, particularly if they have specific instructions for issuing certificates for IIS.
Many certificate authorities require a specific email address at your domain
(admin@mydomain.org, for example). Consider this requirement when selecting a CA.
Selecting a certificate option
You have these options for the HTTPS certificate:
• Use a self-signed certificate
• Use a certificate signed by a trusted certificate authority (CA), such as the customer’s IT
department or a commercial certificate provider
Self-signed certificate
A self-signed certificate allows HTTPS to be enabled but browsers will display a warning to
users because the certificate can’t be validated back to a trusted root. This option is better
than HTTP-only because the connection between the web browser is still encrypted, but you
either must install the selfsigned certificate into every machine’s trusted certificate store or
you run the risk of training users to ignore browser warnings, which is a bad practice.
For instructions on how to implement this option, see “Creating and installing a signed
certificate”.
Signed certificate
A signed certificate can be validated back to a trusted authority. In larger enterprises, the IT
department may install and manage their own trusted certificates on computers and can
sign certificates so they are trusted within the enterprise. Commercially-purchased
certificates are typically trusted by web browsers automatically.
Compass Dealer Security Guide
24
Compass Dealer Security Guide | March 2022
31-00211-01
©2022 Honeywell
Running the Compass server’s HTTPS with a signed-certificate not only encrypts traffic, but
it also allows the browser and end-user to validate that they are communicating with the
genuine server and not an imposter.
For instructions on how to implement this option, see “Creating and installing a signed
certificate”.
To create and install a self-signed certificate
You will use the Compass Config Tool to create, install, and configure a self-signed
certificate.
1. Open the Compass Config Tool.
2. Click Actions >Create Self-Signed Certificate.
3. Fill in the form and then click Generate.
Installation and configuration
31-00211-01
©2022 Honeywell
Compass Dealer Security Guide | March 2022
25
4. Save the certificate.
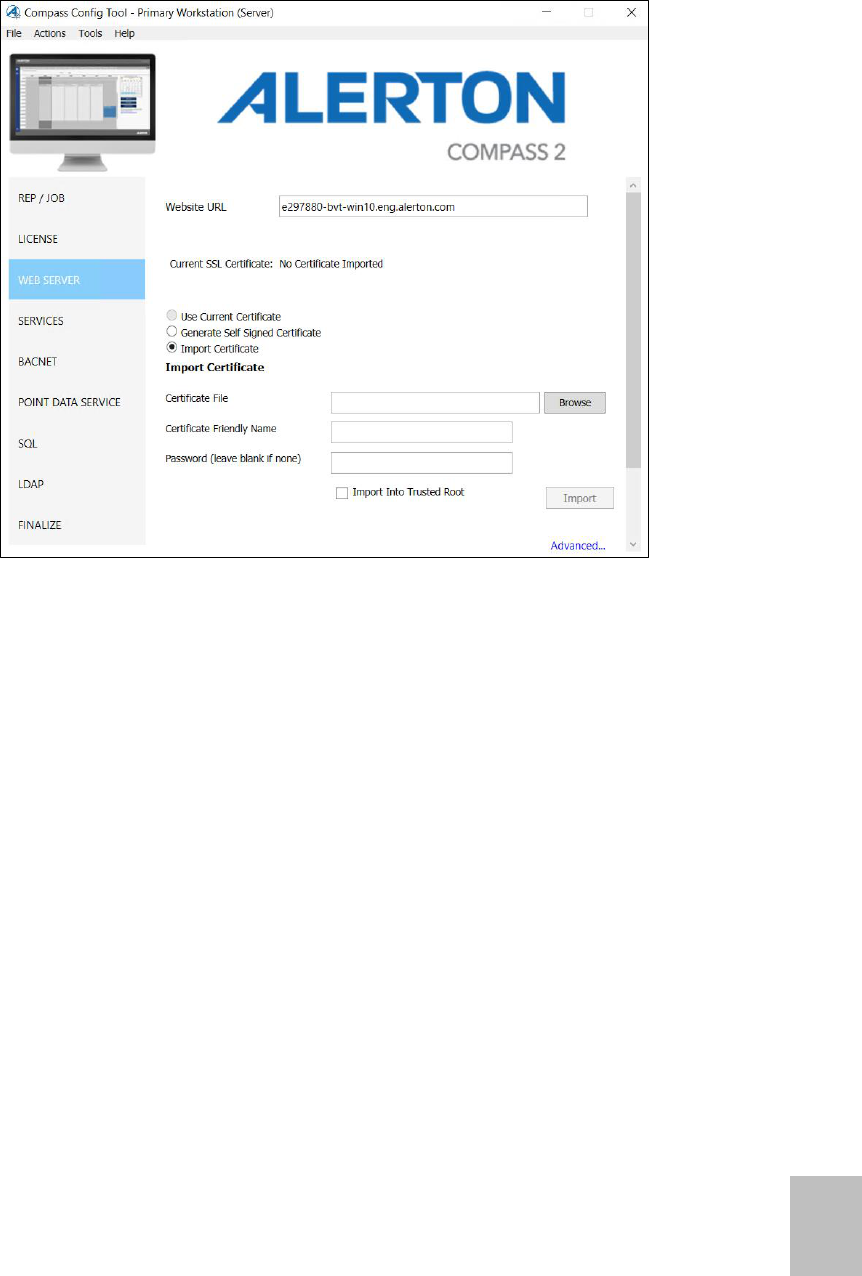
5. Click WEB SERVER in Config Tool and perform below action.
a) Enter Website URL. Select the Use Current Certificate option.
b) Select the Generate Self Signed Certificate option to generate new.
c) Select the Import Certificate option to import existing certificate.
a. Click Browse to select certificate file.
b. Enter Certificate Friendly Name (this how the certificate will be identified in
the Compass Config Tool) and password.
d) Click Import Into Trusted Root check box. And then click Import.
e) Click Advanced…, for advance configuration.
6. Click Apply on the main window of the Compass Config Tool.
Compass Dealer Security Guide
26
Compass Dealer Security Guide | March 2022
31-00211-01
©2022 Honeywell
Creating and installing a signed certificate
You will use Internet Information Services (IIS) Manager to create a certificate request,
complete the request, and export the signed certificate. You will then use the Compass
Config Tool to import the certificate and configure Compass to use it.
To create a certificate request:
1. Click Windows menu and type IIS into the search box to open Internet Information
Services (IIS) Manager.
2. Double-click Server Certificates in the center panel of the IIS Manager window.
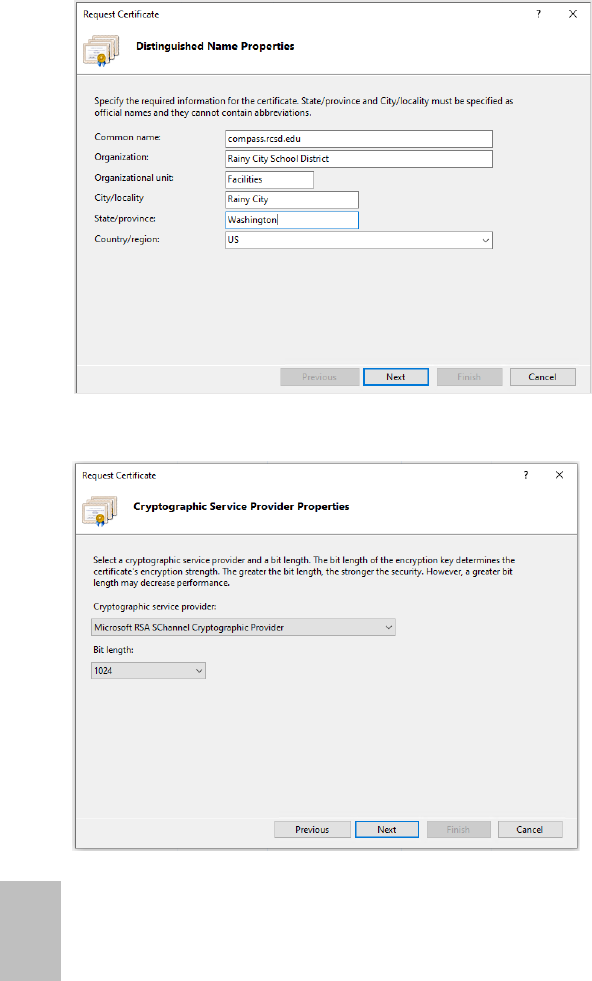
3. Click Create Certificate Request under the Actions panel on the right side of the IIS
Manager window.
4. Fill in the missing data on the Distinguished Name Properties dialog box, and then
click Next.
5. Create a private key
Installation and configuration
31-00211-01
©2022 Honeywell
Compass Dealer Security Guide | March 2022
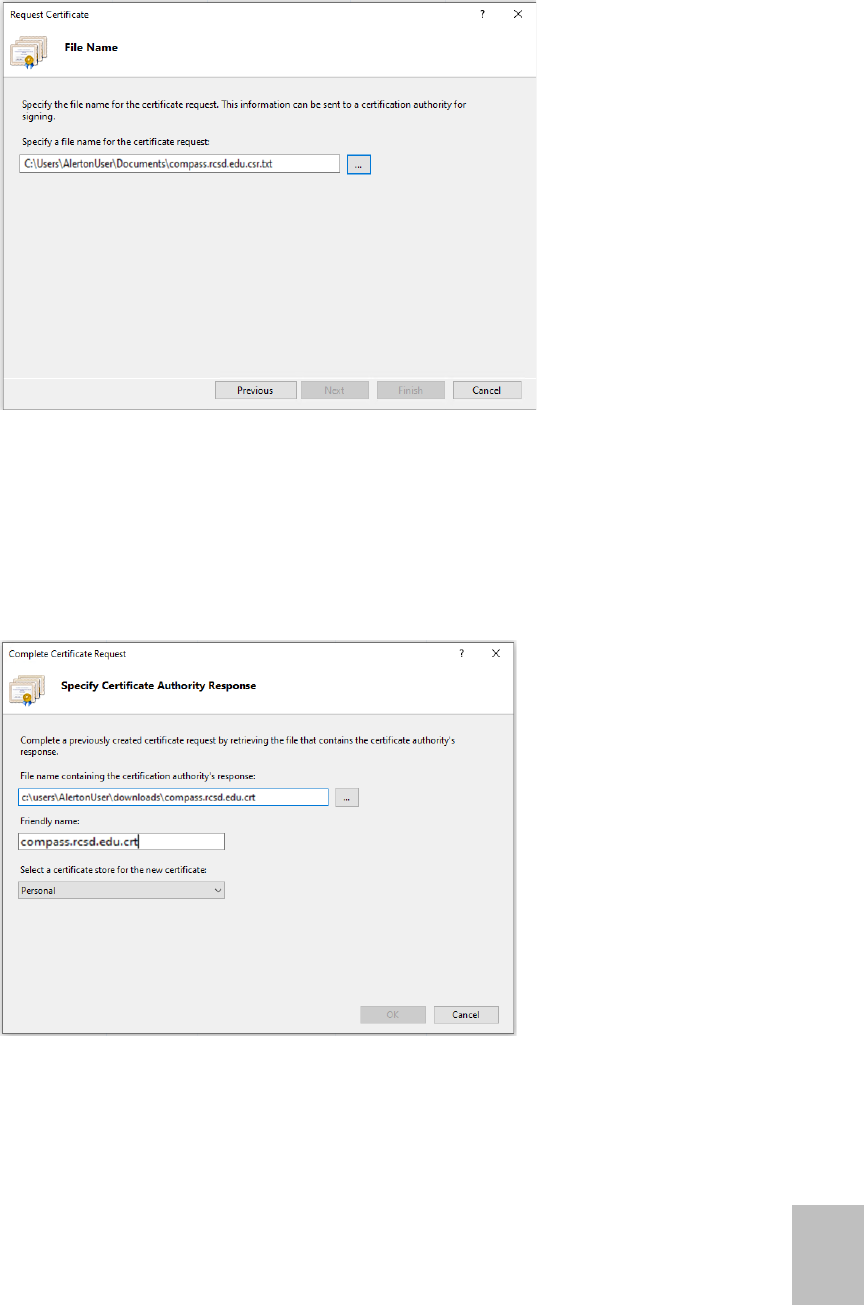
27
6. Save the certificate request.
7. Submit this certificate signing request to the CA and wait for a response.
8. To complete the certificate request, open Internet Information Services (IIS) Manager.
(Click on the Windows menu and type IIS into the search box.)
9. Double-click Server Certificates in the center panel of the IIS Manager window.
10. Click Complete Certificate Request… under the Actions panel on the right side of the IIS
Manager window.
11. Browse to the response file from your CA. It is typically a .cer or .crt file.
12. If the IT or CA also provides root or intermediate certificates, import those now by right-
clicking on each one in Windows explorer and clicking Install.
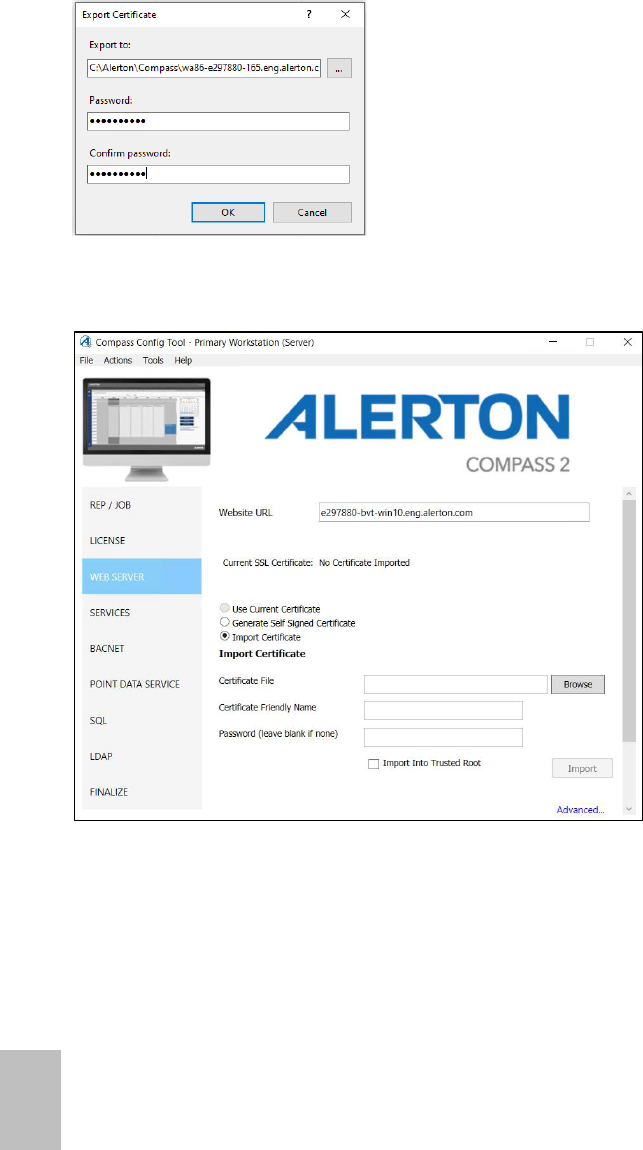
13. Export the certificate: This step both saves the certificate as a backup and allows it to be
imported into the Compass Config Tool.
Compass Dealer Security Guide
28
Compass Dealer Security Guide | March 2022
31-00211-01
©2022 Honeywell
This step is required because the Compass Config Tool also imports the certificate into
the Niagara certificates store and makes changes to the Compass configuration.
14. Select a location for the exported pfx (typically the job directory), specify a password,
and then click OK.
IMPORTANT! Store this password securely.
15. Import the certificate and configure HTTPS: Open the Compass Config Tool, and then
click WEB SERVER in Website Configuration to import certificate.
16. Verify Enable SSL is checked, and the certificate friendly name is listed under SSL
Certificate.
17. Click Apply to save the changes.
NOTE Once Compass and its dependencies (including SQL Server Express) are installed,
keep running windows updates until it comes back with zero important updates to install.
This ensures that the system contains the most recent software patches.

Users and groups
31-00211-01
©2022 Honeywell
Compass Dealer Security Guide | March 2022
29
USERS AND GROUPS
Creating user profiles
When you log in as the Local Administrator and create a new job, the job does not have any
user profiles created for it; you must create them from scratch. Until the Local Administrator
creates user profiles, only the Local Administrator can access the job (in offline mode).
Compass can be connected to an organization’s LDAP server for authenticating logins. This
option should be used if specific password policies regarding password strength, lifetime,
maximum login attempts, etc., are required. For more information about user profiles and the
Local Administrator, see the Compass Workstation Interface User Guide (31-00277).
IMPORTANT Do not edit user profiles in previous versions of Alerton operator workstation
software for use in later versions since not all capabilities are available in previous versions.
Managing user privileges
User privileges determine features, activities, and devices a user can access and groups to
which they are members. For example, you may allow some users to perform several tasks
related to alarms, including setting up new alarms. Other users may be given permissions to
view and acknowledge alarms, but not to create new ones. Some users will have certain
device privileges while others do not. Users may be assigned to multiple groups.
Using security levels
The security level of a user profile determines the access each user has to items on data
displays such as pushbuttons. For example, items on a data display may require a security
level of 5 or above. If a user is assigned a security level less than 5, the item on a data
display will be unavailable or appear not to work. However, the Effective Security Level
(displayed next to the user Security Level on the Add/ Edit User dialog box) takes into
account the security level defined for the user and the security levels defined in all groups of
which this user is a member. The Effective Security Level is the highest of all of those and is
the security level that will actually be used when Compass determines whether to allow the
user access to certain display items. So, if one of the user’s groups has a security level of 7,
the user will be able to access data display items that are security level 7 and below.
Using an authorized period
Use the Authorized Period feature to give users with assigned privileges access to a
Compass system or set the date when you know a trustworthy user should be automatically
locked out of Compass. Unrestricted access allows valid users to use the system at any time
after successfully logging in.
Set up the system to automatically lock out trusted users when they are scheduled to be off
the job for a period of time and are expected to have future access. You want to preserve
their user profile. Once the authorized period is scheduled, Compass will automatically lock
the user out of the system when the server registers midnight on the expiration date.

Compass Dealer Security Guide
30
Compass Dealer Security Guide | March 2022
31-00211-01
©2022 Honeywell
For a user you want to permanently lock out of Compass, delete the user’s profile. Deleting
the user ID does not impact records in the User Activity Log. Deleted user IDs can be
reused but no previous user settings are preserved.
Using group memberships
Users may be managed by group assignment. Users are assigned privileges and data
access through their user profiles, and they can gain additional privileges and access
through group memberships. Trendlog, alarm history, schedules and all other items
associated with BACnet device items can be filtered by group. Set up groups by floor,
building, campus, city or any other categorization strategy and then switch data views as
you work to see different groups’ data.
To create new user profiles for a job
1. On the Tools menu, click Users and Groups. The Users and Groups dialog box appears
with a list of current users. If the job is a new one, no users will be listed.
2. Click Add.
3. On the General tab, type a User ID, name, and description in the boxes provided. User
IDs must be from 1 to 40 characters. Spaces, numbers, lower and upper case letters are
all valid characters.
4. In the Security Level box, type a security level from 0 to 10 (0 is the lowest level of
access; 10 is the highest).
5. Type a password in the box provided. Passwords must be 3 to 20 characters, numbers
and letters only, and they are case sensitive.
6. Click the Starting Display command button, select a starting display or device template
for this user, and then click OK. If you do not specify a start display, and the user is not
assigned to a primary group with a specified start display, the system default start
display (1) will be used.
7. Specify the user’s authorized time to access the system. This can be used to lock a user
out during personal time off, especially when their departure and return dates are known.
NOTE: Users that should no longer have access to the job should be deleted, not
expired. Deleting a user ID does not affect records in the User Activity Log.
8. On the User Device Access and Privileges tab, specify the range of devices this user
shall have access to and then select privileges for this user. Click the plus (+) symbol to
expand the level of detail. Select check boxes beside a feature to enable access for this
user. A check mark indicates full access. A grayed box indicates partial access within a
feature category. A cleared box indicates no access.
9. On the Group Membership tab, assign this user to a group, if desired. The Primary
Group column displays which group start display this user will use if their user profile
doesn’t have an assigned start display.
10. On the Effective Device Access and Privileges tab, specify which devices for which this
user has access and privileges. The Effective Device List displays a complete list of all
the devices this user has access to, even devices he can access due to group
membership that exceed his/her individual user access.
11. Click OK to save the user profile.
12. Repeat steps 2 through 11 for each user profile you want to create.

Users and groups
31-00211-01
©2022 Honeywell
Compass Dealer Security Guide | March 2022
31
13. Click Close when you have finished adding user profiles.
Using user accounts to enforce security
Securing access to the operating system
Compass does not use Windows user accounts for application security; instead it has its
own user database. Windows user accounts are used to secure access to the operating
system and still provide a very valuable layer of protection. Ensure that only authorized
users have access to computers that have the Compass thick-client software installed.
Windows user accounts and passwords
Access is gained to the Windows operating system by logging onto the computer using a
user account name and password. This is true for both local and remote terminal services
access. Because user accounts may be well known or easily guessed within an
organization, the password becomes the prime vehicle for authentication. User account and
password policies are therefore important security measures.
User and password policies and settings
Since users are not authenticated using Windows, configure Compass so that each user
has a unique login name and password. Ensure that when an employee, or any other user
with permanent or temporary access, leaves the organization or no longer needs access,
their user accounts are disabled. For example, when a subcontractor is on the job working
on the Compass HVAC system, they are given access to the system. Monitor their access
while the work is in progress and then disable their credentials once the work is complete. In
addition, because Compass software is available using a browser, ensure that the Compass
user account is also disabled.
Follow Windows user and password policies to secure access to the operating system
running
Compass. As a general rule:
• Review user accounts on a regular basis.
• Disable or delete all unused accounts.
• Disable all anonymous accounts
• Disable all guest accounts.

Compass Dealer Security Guide
32
Compass Dealer Security Guide | March 2022
31-00211-01
©2022 Honeywell
Configure password policies so that Windows account passwords are difficult to guess, and
they are changed often. The following settings are suggested:
Parameter
Setting
Comment
Maximum password
age
45 to 90 days
Forces the choice of a new password after this time. Configure the setting for
the Administrator account shorter than a normal system user. A maximum of
30 days is recommended.
Minimum password
age
1 to 5 days
Prevents cycling passwords too rapidly
Minimum password
length
11 characters
Improves encryption and makes guessing harder. Using several words to form a
phrase can make a stronger password that is also easier for the user to
remember. For example, "My dog Fido has 50 fleas!" is a much stronger
password, and much easier to remember, than "X$9d8oc-@Ek"
Enforce password
history
24 passwords
remembered
Prevents reuse of the same password too quickly.
Password must meet
complexity requirements
Enabled
Improves encryption and makes guessing harder. Suggest requiring at least
three of the following:
-Uppercase Character
-Lowercase Character
-Number
-Special Character
Store passwords using
reversible encryption
Disabled
Prevents passwords from being stored in (the equivalent of) clear-text.
Account lockout
threshold
5 invalid logon
attempts
Prevents continual password guessing by disabling an account after the
specified number of attempts. Consider disabling account lockout for
operator (or other user) accounts where denial of service or loss of view
would be detrimental to safety or the continued operation of the facility. See
Account Lockout Best Practices White Paper for more information.
Account lockout
duration
30 minutes
Specifies the period of time during which a user will not be able to log on
following an
account lockout. (Note that the administrator can re-enable the account
before the expiration of the specified lockout period.)
Reset account
lockout counter after
29 minutes
The time before the account lockout is reset to zero. For example, with the
account lockout set at 10, and the lockout counter set at 29 minutes, lockout will
occur if there are 10 invalid logon attempts within 29 minutes. Note that the
lockout counter must be less than the lockout duration.

Users and groups
31-00211-01
©2022 Honeywell
Compass Dealer Security Guide | March 2022
33
Compass Dealer Security Guide
Service and primary workstation accounts
The Compass 1.6.0.1 Config Tool automatically configures the Windows users and groups
that Compass runs as and sets the appropriate permissions on Compass directories, files,
and certificates.
The Config Tool makes the following changes:
• Creates the “CompassUsers” Windows group and adds the current logged-in user to it
• Removes the “Authenticated Users” Windows group from Compass directory permissions
• Makes the following permissions assignments:
User/Group
Directory
Permissions
Note
CompassUsers
Compass installation directory (e.g. c:\Alerton\Compass\2.0
Full
CompassUsers
%ProgramData%\Compass
Full
Server Only
Minimum password
ength
System\Web\Apps under Compass installation directory
Full
Server Only
Enforce password
istory
System\Web\Logs under Compass installation directory
Full
Server Only
If other users need to be added to the CompassUsers group, you can re-run the Config Tool
as each user or use Windows tools (e.g. lusrmgr.msc for local users and groups) to assign
users to the CompassUsers group.
Some operations, such as sharing a folder with File Sharing, may affect or reset some of the
permissions settings made by the Config Tool. Re-running the Apply step in the Config Tool
will verify and reapply settings.

Compass Dealer Security Guide
34
Compass Dealer Security Guide | March 2022
31-00211-01
©2022 Honeywell
SOFTWARE AND OPERATING SYSTEM SECURITY
This section includes information about installing and configuring non-Compass software
and the operating system.
Virus protection
Although some modern threats can bypass even the best antivirus checks, antivirus
software is still an essential element of a comprehensive security strategy. Alerton tests the
Compass system with McAfee; other antivirus software can be used, but Alerton has not
evaluated those packages for compatibility with Compass.
Installing antivirus software
Install antivirus software on every computer in the network, including the Compass primary
workstation, Compass client workstations, and computers used for web browser access.
After installing antivirus software, check the Windows Event Logs and ensure no errors are
reported. If the system starts experiencing failures, the inability to read or write files, the logs
show deadlock errors, or the system shows any other unusual behavior, disable the
antivirus software to see if the failures continue. Note that some antivirus software may need
to be completely uninstalled in order to be disabled.
Ensure frequent updates to antivirus signature files
It is important to update antivirus signature files frequently by subscribing to the updates of
your antivirus software vendor(s) and leveraging enterprise antivirus policies and practices
when available.
Since new viruses are released every day, the system will remain vulnerable to attack if the
signature files are not updated at the same rate. Where it is not practical to perform updates
daily, monitor reputable web sites that publish information about new virus attacks so that
the system can be isolated if a specific threat appears.
Receipt of new signature files generally requires Internet access so that the files can be
downloaded from the antivirus software vendor. If possible, set up servers for the controlled
distribution of antivirus signature files.
Configuring active antivirus scanning
Adopting an active virus scanning strategy as on-access scanning provides the best real-
time protection for your system. Configure the virus scanner to run on-demand scans during
regular, scheduled maintenance to catch any malicious files or programs which may be
dormant on the computer. Configure both on-access and on-demand scanning to:
• Scan the boot sectors of all disks.
• Move infected files to a quarantine directory and notify the user that an infected file was
found. Allow the user to clean up the infection.
Regularly review virus scan reports as part of the active scanning strategy.

Software and operating system security
31-00211-01
©2022 Honeywell
Compass Dealer Security Guide | March 2022
35
Tuning antivirus scanning for system performance
When formulating your virus scanning strategy you must take into account the potential
impact on critical system resources. For example, if the Compass workstation is
experiencing problems due to low system resources, you may need to:
• Ensure that antivirus software only runs when system resources on the computer are
adequate to meet system needs.
• Limit system resources that are used by antivirus software during scanning.
To find the proper balance between primary workstation performance and virus protection
you need to make configuration choices such as disabling scanning on reading of files and
changing the default process-based scanning to per-process scanning.
If your site requires heavy antivirus scanning, then consider running SQL Server on a
different computer to lessen the load on the Compass primary workstation.
Do not automatically schedule full system scans, as this can result in severe degradation of
performance, which could impact the ability of operators to respond to an incident.
Service packs and security updates
An important part of the overall security strategy is to ensure that the operating system is
kept up to date with the latest patches and updates. Before turning the system over to the
customer, ensure that you have:
• Installed the latest Compass version.
• Updated Windows to the latest service pack supported by Compass (this information is
available in the Compass release notes or by contacting Technical Support).
• Configured Windows Update to automatically check for updates. For the Compass primary
workstation, discuss with the customer about how to automatically or manually apply
updates. The customer may opt to install them manually in order to control when the
Compass primary workstation gets rebooted. For client workstation computers, updates
should be installed automatically.

Compass Dealer Security Guide
36
Compass Dealer Security Guide | March 2022
31-00211-01
©2022 Honeywell
Service and primary workstation accounts
Run Windows services required by Compass under an account with the lowest possible set
of privileges. Do not set the Logon interactively permitted permission on the account. The
following classes of accounts are suggested in order of preference:
• Local service accounts.
• Local accounts with minimum rights.
• Domain accounts with minimum rights.
• The Network Service account.
• Local or domain user accounts belonging to the Local Administrators group.
• The local system accounts.
Services required by compass
The following table lists the services that are installed and used by Compass. Failure of any
of these services will cause the application to become inoperable. In addition to these
services, there are many Windows and antivirus services that are required for proper
operation of the operating system.
Display name
Service Name
Required
Dependencies
BACtalk Ethernet
Protocol
EthuioService
Y
Ethuio
SQL Server
Compass can be configured to use SQL Server authentication as well as Windows
authentication. In line with Microsoft's recommended best practices, when possible, use
Windows Authentication and disable mixed-mode authentication in the SQL Server
configuration. See Choose an Authentication Method on the Microsoft web site at
http://msdn.microsoft.com/en-us/library/ms144284.aspx for additional information.
Monitoring and logging services
System monitoring
Diligent system monitoring will help guard your system against unauthorized access.
However, there is always the possibility that an attacker will succeed in circumventing all the
safeguards and compromise the system. If this happens, it is important to discover the
breach and prevent further damage as rapidly as possible. The earlier a system breach is
detected and the more evidence that is captured, then the less damage is likely to occur and
the greater the chances of identifying the intruder.

Software and operating system security
31-00211-01
©2022 Honeywell
Compass Dealer Security Guide | March 2022
37
Setting up and analyzing Windows audit logs
Enable the auditing of your file system and registry access. If you suspect that the system is
being misused, then Windows auditing provides a useful tool to track who did what and
when.
Once Windows auditing is enabled, review the Windows audit logs frequently and take
action if unexpected activity is seen.
Restricting access to event logs
By default, anonymous accounts and guest accounts can view Windows Event Logs when
logged in to a Windows computer. Restrict this access on the Compass primary workstation,
because the System, Application, and Security logs may contain sensitive information about
the system and its operations.
IMPORTANT: Back up your system and then back up the registry hive before making any
modifications in the Windows registry. If a mistake occurs, you can then recover by reverting
back to the backup of the hive—or worse case, revert back to the system backup—to
recover and minimize downtime.
CAUTION: Mistakes made while editing the Windows registry can cause serious issues with
your computer. Follow these steps precisely. If you make a mistake you cannot fix, restore
your backup and start over.
To restrict access to administrators and system accounts only
1. Choose Start > Run to open the Run window.
2. Type regedit and then click OK.
3. Expand the HKEY_LOCAL_MACHINE tree until you open the
HKEY_LOCAL_MACHINE\SYSTEM\CurrentControlSet\Services\EventLog registry key.
4. Select the Security sub key.
5. Right-click in the right window and then choose New > DWORD Value to create a new
registry value.
6. Name the new value RestrictGuestAccess.
7. Right-click RestrictGuestAccess and then select Modify.
8. Type 1 in the RestrictGuestAccess value data field and then click OK.
9. Repeat steps 5 through 8 for the Application and System sub keys.
10. Close the Registry editor.

Compass Dealer Security Guide
38
Compass Dealer Security Guide | March 2022
31-00211-01
©2022 Honeywell
Networks and firewalls
This section contains information on securely configuring networks and firewalls.
Network ports and firewall settings
The following table describes the ports and processes in a Compass system. This includes
the
processes that are part of Compass itself (station.exe, bactalk.exe) and external processes,
such as SQL Server.
See the example Ascent Installation diagram in “System Overview” on Page 9.
The table has the following columns:"
• Default Port and the Protocol (TCP or UDP)
• Purpose of the port.
• Windows process that opens the port.
• Whether or not the default port needs to be changed.
• Whether or not incoming connections (for TCP) or traffic (for UDP) should be allowed
through the Windows firewall on the computer where the process is running.
• Whether or not incoming connections or traffic should be allowed through the BAS firewall.
• Additional notes are listed below the table.
Table 1.1 Network ports and firewall settings
Default
Port/Protocol
Purpose
Windows
Process
Change
from
Default
Allow Incoming
Connection/Traffic Through
Windows Firewall?
Allow through
BAS Firewall?
Notes
80/TCP
Compass public
web server- HTTP
station.exe
No
Yes
Possibly for
remote web
access
1,2
443/TCP
Compass public
web server- HTTPS
station.exe
No
Yes
Possibly for
remote web
access
2
1433/TCP
SQL Server (if used)
sqlservr.exe
No
Depends: Yes, if SQL Server is
on a different computer than the
Compass primary workstation;
no, if they are on the same
computer.
Rarely
3
1911/TCP
Fox (Niagara
Application protocol)
station.exe
Yes
No
No
4
8088/TCP
Inter-process
communication
(BACtalk process)
bactalk.exe
No
No
No
6

Software and operating system security
31-00211-01
©2022 Honeywell
Compass Dealer Security Guide | March 2022
39
Default
Port/Protocol
Purpose
Windows
Process
Change
from
Default
Allow Incoming
Connection/Traffic Through
Windows Firewall?
Allow through
BAS Firewall?
Notes
82/TCP (in
HTTP mode) or
446/TCP (in
HTTPS mode)
Interprocess
communication
(Niagara station)
station.exe
No
No
No
6
83/TCP (in
HTTP mode) or
447/TCP (in
HTTPS mode)
Interprocess
communication
(Advanced
Scheduling, aka
EASE)
IIS
No
No
No
6
81/TCP (in
HTTP mode) or
444/TCP (in
HTTPS mode)
Interprocess
communication
(Identity Server)
IIS
No
No
No
6
47808/UDP
BACnet/IP network
connection
bactalk.exe
Yes
Yes
No
7,8
47809/UDP
BACnet/IP network
connection
station.exe
Yes
Yes
No
7,8
NOTESNOTES
1
Many users expect that they only need to enter the web address for websites, so if HTTP is enabled, then the web
server will automatically redirect the request to HTTPS. If this is desired, then this port must be allowed through the
Windows firewall.
2
If direct remote web interface is supported, then this port must be allowed through the BAS firewall.
3
The SQL Server port may be allowed through the BAS firewall if a system outside of the BAS also needs to access
the SQL Server. If there is a different firewall protecting a SQL Server that is installed on a different machine than the
Compass Server, then this port must be allowed in that firewall.
4
The built-in Niagara station listens on the Fox port, but it is only needed for advanced troubleshooting. Standard
installations do not need to allow this port through the Windows firewall nor BAS firewall.
This value is configured in bactalk.ini
6
These ports are used for inter-process communication between Compass processes. None need to be allowed
through the Windows firewall.
For the Niagara Station, Advanced Scheduling, and Identity Server, the port is configured in the Config Tool and will
differ if Compass is configured for HTTP or HTTPS.
For the BACtalk process, the port is configured in bactalk.ini. This process only responds to requests from localhost.
7
If you follow the network configuration guidelines in this manual, then a Compass system will never need to pass
UDP traffic through the BAS firewall.
8
These values must be changed from their defaults. They can be configured on the Network Tab of General System
Setup.
Enable BACnet/IP: Enables BACnet/IP communications to be sent and received at this workstation. Click Settings
to set up the IP connection and configure the following:
1.) The IP address of the BBMD it registers with, this can be a BBMD on the same subnet (0 router hops), or
anywhere on the internetwork.

Compass Dealer Security Guide
40
Compass Dealer Security Guide | March 2022
31-00211-01
©2022 Honeywell
2.) The UDP port of the BBMD.
3.) A UDP port for the operator workstation, which should be different than the UDP port of the BBMD, and must be
different if the client workstation and BBMD are on the same subnet (0 router hops).
4.) The BACnet/IP Virtual Network Number that the client workstation joins.
5.) A re-registration interval, in seconds, after which the workstation and BBMD reconfirm communications.
Niagara BACtalk BACnet Settings: The Niagara component of Compass facilitates the display of building control
data in a standard Web browser using the HTTP protocol. It also communicates with devices using BACnet/IP. Click
Settings to configure the Niagara component so that it communicates properly with devices, the BACtalk component,
and web browsers.
IMPORTANT! Coordinate with network administrators to ensure proper network operation.
Device instance and Device description
These fields are automatically populated. These are properties of the Compass primary workstation; use caution if
you change them.
BACnet/IP vnet and BACnet/IP port
Type a virtual network number and port number. Leaving the default value (0) disables communication.
Register with BBMD as foreign device
If the workstation will communicate across networks, register it as a foreign device.
1.) Type the IP address of the BBMD it registers with, this can be a BBMD on the same subnet (0 router hops), or
anywhere on the internetwork.
2.) Enter the UDP port of the BBMD.
3.) Change the re-registration interval if necessary. This is the interval (in seconds) after which the workstation and
BBMD reconfirm communications. The default interval is 300 (five minutes); a shorter interval increases network
traffic and may impact system performance.
Note: If you select Register with BBMD as foreign device and the IP address and port number match those in the
BACnet/IP fields, then Compass will clear the Register with BBMD fields. To over-ride this behavior, select Register
with BBMD as foreign device again. Compass will not clear the selection a second time.
Configuring the Windows firewall
The Windows firewall provides another layer of protection and should always be enabled.
When the firewall is on, it will reject any incoming connections by default. Exceptions must
be put into the firewall to allow incoming connections to succeed. By default, the Compass
installation does not automatically configure the Windows firewall. If not manually
configured, on first usage the Windows firewall will prompt the user to add a firewall
exception. Use the following configuration settings:
• The firewall is on.
• The firewall is on for all network locations (Home or work, Public, or Domain).
• The firewall is on for all network connections.
• The firewall is blocking all inbound connections except those that you specifically allowed in
Table 1.1 on page 33.

Software and operating system security
31-00211-01
©2022 Honeywell
Compass Dealer Security Guide | March 2022
41
Detecting network intrusion
Network Intrusion Detection Systems (NIDS) can take many forms. NIDS can be a
dedicated server on the same network branch, freeware software available under GNU or
similar licenses (most of these are aimed at UNIX systems), or commercial products aimed
specifically at Windows systems.
The purpose of NIDS is to scan incoming network packets and look for unusual traffic or for
specific malformed packets known to be associated with attacks. If anomalies are found,
NIDS take action such as raising alerts or even disconnecting the computer from the
network. The latter is a dangerous option which causes its own denial of service while
preventing damage to the system by closing network ports, and so on.
Most firewalls, switches, and routers have reporting capabilities that can report various
levels of events varying from debugging to emergency failure. These reports can be viewed
using telnet, collected by a central logging server, or emailed to an administrator. For
example, the Cisco PIX firewall and Catalyst 4500 switches can be configured to send
selected levels of events to a central syslog server where further analysis can occur, and
significant events can be detected.
Syslog servers are common on Unix systems, and third-party syslog services are available
for Windows. They vary in functionality and cost, from freeware, which simply writes to a log
file, to sophisticated NIDS that analyze the logs in detail. As well as being able to control the
level of severity of events, the PIX firewall allows the suppression of individual messages.
This can significantly reduce clutter and also provide some ability to recognize common
attack signatures and then raise the appropriate alarms.
When you configure network event logs, maintain a balance between collecting too many
events (and missing something important) and filling storage disks and deleting information
(which is subsequently needed for an intrusion investigation).
Other forms of intrusion detection will search event logs looking for unusual events or will
compare the current file system to a known good image. Be careful when running such tools
to prevent them from using too many resources and interfering with the control system.
Wireless access points
In general, follow these guidelines when setting up and configuring a wireless network:
• Do not use the default Service Set Identifier (SSID); configure a unique SSID.
• Disable SSID broadcast.
• Use Wi-Fi Protected Access II (WPA2-Personal) or (WPA2-Enterprise) encryption. Wired
Equivalent Privacy (WEP) is not sufficiently secure.
• Use the correct class of network equipment. For example, do not use home or small office
equipment for large enterprise jobs.
• Change the default administrator password.

Compass Dealer Security Guide
42
Compass Dealer Security Guide | March 2022
31-00211-01
©2022 Honeywell
• Ensure access points are running the latest firmware.
• Physically secure access point devices.
• Use a separate access point for public, non-secured access, such as WiFi for guests or
customers.
• When feasible, enable media address control (MAC) filtering and enter the MAC addresses
for all the wireless devices.
Hardening
Hardening involves taking additional actions to make it more difficult to obtain unauthorized
access or to circumvent security mechanisms.
Physical computer
Implement additional steps to harden computers against unauthorized access:
• If computers with DVD drives are readily accessible, fit locks or remove the DVD drives.
Disable unused USB ports to prevent USB drives or other uncontrolled devices from being
connected to the system. Such devices may be used to introduce a virus or other malware.
Also disable or physically protect the power button to prevent unauthorized use.
• Set the BIOS to boot only from the operating system’s root partition/drive.
• Set a BIOS password (ensure that this does not prevent automatic startup).
• Remove the floppy and CD/DVD drives from the computer.
• Disable USB ports and other ports capable of being used for memory sticks and other
portable storage devices.
Operating system
Operating system hardening information is constantly evolving, so it is best to follow guidelines
and standards directly from reputable sources:
• Microsoft Security Engineering Portal: https://www.microsoft.com/en-us/securityengineering
• Windows Server Security documentation: https://docs.microsoft.com/en-us/windows-
server/security/security-and-assurance
• NIST (National Institute of Standards and Technology) standards: Search the internet for
"NIST windows server hardening" to get the latest information and standards
• Center for Information Security (CIS): https://www.cisecurity.org/
Applications that can assess system hardening and even apply settings per best practices or
standards are available from third-party companies.

System delivery
31-00211-01
©2022 Honeywell
Compass Dealer Security Guide | March 2022
43
SYSTEM DELIVERY
This section contains information on activities that need to happen when the BAS is
delivered to the system owner.
• Documentation includes security information, configuration settings, administration
usernames and passwords, disaster and recovery plans, backup and restore procedures
• End users trained on security maintenance tasks.

Compass Dealer Security Guide
44
Compass Dealer Security Guide | March 2022
31-00211-01
©2022 Honeywell
MAINTENANCE AND DECOMMISSIONING
Maintenance and decommissioning information can be found in the Compass End-User
Security Guide (31-00212).

Appendix: SSL certificate country codes
31-00211-01
©2022 Honeywell
Compass Dealer Security Guide | March 2022
45
APPENDIX: SSL CERTIFICATE COUNTRY CODES
Use these country codes to create a self-signed certificate.
US United
States of
America
CA Canada
AX Åland
Islands
AD Andorra
AE United Arab
Emirates
AF Afghanistan
AG Antigua and
Barbuda
AI Anguilla
AL Albania
AM Armenia
AN Netherlands
Antilles
AO Angola
AQ Antarctica
AR Argentina
AS American
Samoa
AT Austria
AU Australia
AW Aruba
AZ Azerbaijan
BA Bosnia and
Herzegovina
BB Barbados
BD Bangladesh
BE Belgium
BF Burkina
Faso
BM Bermuda
BG Bulgaria
BH Bahrain
BI Burundi
BJ Benin
BN Brunei
Darussalam
BO Bolivia
BR Brazil
BS Bahamas
BT Bhutan
BV Bouvet
Island
BW Botswana
BZ Belize
CA Canada
CC Cocos
(Keeling)
Islands
CF Central
African
Republic
CH Switzerland
CI Cote D'Ivoire
(Ivory Coast)
CK Cook
Islands
CL Chile
CM Cameroon
CN China
CO Colombia
CR Costa Rica
CS
Czechoslovakia
(former)
CV Cape Verde
CX Christmas
Island
CY Cyprus
CZ Czech
Republic
DE Germany
DJ Djibouti
DK Denmark
DM Dominica
DO Dominican
Republic
DZ Algeria
EC Ecuador
EE Estonia
EG Egypt
EH Western
Sahara
ER Eritrea
ES Spain
ET Ethiopia
FI Finland
FJ Fiji
FK Falkland
Islands
(Malvinas)
FM Micronesia
FO Faroe
Islands
FR France
FX France,
Metropolitan
GA Gabon
GB Great
Britain (UK)
GD Grenada
GE Georgia
GF French
Guiana
GG Guernsey
GH Ghana

Compass Dealer Security Guide
46
Compass Dealer Security Guide | March 2022
31-00211-01
©2022 Honeywell
GI Gibraltar
GL Greenland
GM Gambia
GN Guinea
GP
Guadeloupe
GQ Equatorial
Guinea
GR Greece
GS S. Georgia
and S.
Sandwich Isls
GT Guatemala
GU Guam
GW Guinea-
Bissau
GY Guyana
HK Hong Kong
HM Heard and
McDonald
Islands
HN Honduras
HR Croatia
(Hrvatska)
HT Haiti
HU Hungary
ID Indonesia
IE Ireland
IL Israel
IM Isle of Man
IN India
IO British
Indian Ocean
Tty.
IS Iceland
IT Italy
JE Jersey
JM Jamaica
JO Jordan
JP Japan
KE Kenya
KG Kyrgyzstan
KH Cambodia
KI Kiribati
KM Comoros
KN Saint Kitts
and Nevis
KR Korea
(South)
KW Kuwait
KY Cayman
Islands
KZ Kazakhstan
LA Laos
LC Saint Lucia
LI Liechtenstein
LK Sri Lanka
LS Lesotho
LT Lithuania
LU
Luxembourg
LV Latvia
LY Libya
MA Morocco
MC Monaco
MD Moldova
ME
Montenegro
MG
Madagascar
MH Marshall
Islands
MK Macedonia
ML Mali
MM Myanmar
MN Mongolia
MO Macau
MP Northern
Mariana Islands
MQ Martinique
MR Mauritania
MS Montserrat
MT Malta
MU Mauritius
MV Maldives
MW Malawi
MX Mexico
MY Malaysia
MZ
Mozambique
NA Namibia
NC New
Caledonia
NE Niger
NF Norfolk
Island
NG Nigeria
NI Nicaragua
NL Netherlands
NO Norway
NP Nepal
NR Nauru
NT Neutral
Zone
NU Niue
NZ New
Zealand
(Aotearoa)
OM Oman
PA Panama
PE Peru
PF French
Polynesia
PG Papua New
Guinea
PH Philippines
PK Pakistan
PL Poland
PM St. Pierre
and Miquelon
PN Pitcairn
PR Puerto Rico

Appendix: SSL certificate country codes
31-00211-01
©2022 Honeywell
Compass Dealer Security Guide | March 2022
47
PS Palestinian
Territory
PT Portugal
PW Palau
PY Paraguay
QA Qatar
RE Reunion
RO Romania
RS Serbia
RU Russian
Federation
RW Rwanda
SA Saudi
Arabia
SB Solomon
Islands
SC Seychelles
SE Sweden
SG Singapore
SH St. Helena
SI Slovenia
SJ Svalbard
and Jan Mayen
Islands
SK Slovak
Republic
SL Sierra
Leone
SM San Marino
SN Senegal
SR Suriname
ST Sao Tome
and Principe
SU USSR
(former)
SV El Salvador
SZ Swaziland
TC Turks and
Caicos Islands
TD Chad
TF French
Southern
Territories
TG Togo
TH Thailand
TJ Tajikistan
TK Tokelau
TM
Turkmenistan
TN Tunisia
TO Tonga
TP East Timor
TR Turkey
TT Trinidad and
Tobago
TV Tuvalu
TW Taiwan
TZ Tanzania
UA Ukraine
UG Uganda
UM US Minor
Outlying
Islands
US United
States
UY Uruguay
UZ Uzbekistan
VA Vatican City
State (Holy
See)
VC Saint
Vincent/Grenad
ines
VE Venezuela
VG Virgin
Islands (British)
VI Virgin
Islands (U.S.)
VN Viet Nam
VU Vanuatu
WF Wallis and
Futuna Islands
WS Samoa
YE Yemen
YT Mayotte
ZA South Africa
ZM Zambia
--
--
--

Compass Dealer Security Guide
48
Compass Dealer Security Guide | March 2022
31-00211-01
©2022 Honeywell
COMPASS INSTALLATION SECURITY CHECKLIST
Compass Job Name: _____________________________________________________
Compass Job Location: ___________________________________________________
Installer: ___________________________________ Date: _______________________
Complete the following security tasks for your Compass installation.
Design a secure Compass installation considering both software and hardware
vulnerabilities. See “Design and planning” page 11.
Develop a Disaster and Recovery Plan. See page 12.
Develop a Backup and Recovery Strategy. See page 13.
Install, configure, and keep anti-virus software updated. See page 34.
Keep the operating system updated. See page 31.
Secure access to the operating system using user accounts. See page 31.
Secure access to Compass using user accounts. See page 31.
Secure access to SQL Server using user accounts. See page 36.
Set up monitoring and logging services to scan for unauthorized access. See page 36.
Securely configure networks and firewalls. See page 38.
Set up network intrusion detection. See page 41.
Secure wireless access points. See page 41.
Secure SQL Server access. See page 41.
Harden the system to further safeguard against unauthorized access. See page 42.
Deliver all required system information upon delivery to the system owner. See page 43.
Train end-users on security maintenance tasks at system delivery. See the Compass End-
User Security Guide (31-00212) for this information.
This page is intentionally left blank.

ALERTON
715 Peachtree St NE
Atlanta, Georgia 30308
alerton.com
31-00211-01
I
2022-04
© 2022 All Rights Reserved
Honeywell International Inc.
