http://hwllhome.co/eut-T6
Online Guides
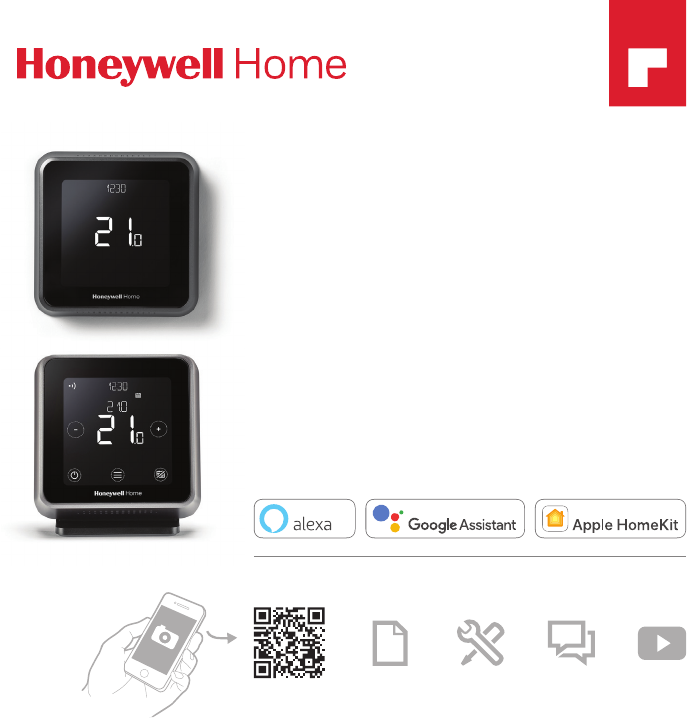
T6 / T6R
Smart Thermostat
EN User Guide
WORKS WITHWORKS WITH THE
WORKS WITH

2
• Connects to the Internet so you can control your heating and stored hot water
system from anywhere with the Honeywell Home App.
• Remotely view and change your heating and stored hot water system settings.
• Diverse programming options that fit any lifestyle:
- Time Scheduling – program schedule supports daily or 52 with 6 time periods for each day
- Geofencing – use a smartphone’s location to manage comfort when home or away
- Smart Scheduling – use a combination of geofencing and time scheduling to fit a busy lifestyle
• Group scheduling for multiple devices and locations (set-up and manage via the
Honeywell Home App).
• Receive alerts (such as boiler failure) from the Thermostat, App, and email.
• Get automatic upgrades.
• The free Honeywell Home App is available for Apple
®
iPhone
®
and iPad
®
devices at
iTunes
®
or at Google Play
®
for all Android™ devices.
Need help?
If you need more information, or for help with your T6/T6R Smart Thermostat go to:
getconnected.honeywellhome.com
T6/T6R Smart Thermostat Features
Honeywell Home
3
Contents
Quick reference to the display ............................................................................. 4
Quick reference to the icons ................................................................................5
Navigating the menu................................................................................................5
Main menu.....................................................................................................................6
Connecting to a WiFi® network .........................................................................7
Disconnect or reconnect to a WiFi network ...............................................7
Setting the system mode .......................................................................................8
Turn the schedule On/Off ......................................................................................8
Schedule options .......................................................................................................8
Preset energy-saving schedules ........................................................................9
Setting the vacation mode ....................................................................................9
Adjusting a program schedule .........................................................................10
Overriding a program schedule .......................................................................11
Optimisation functions ........................................................................................13
Locking the interface ............................................................................................13
Troubleshooting ....................................................................................................... 14
4
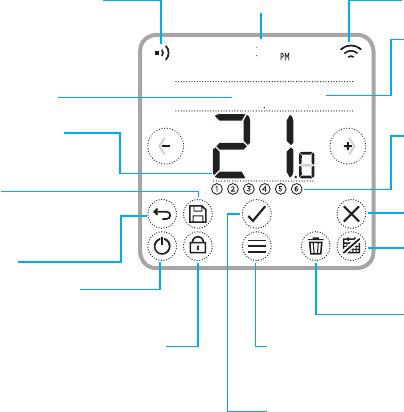
Quick reference to the display
1234
210
Note: To save power, the screen will dim and enter idle mode 45 seconds after
the last button touch. The screen will light up when you touch any button.
Save
- Saves schedule
settings
Messaging centre
- Shows device setup
options, reminders and
alerts, status of program
schedule overrides
Menu
- Touch to display
options
Start/stop Schedule
- Activates or deactivates
program schedule
Delete
- Deletes a
schedule period
Schedule period
- Indicates current
schedule period
Cancel
Wi-Fi communication
Select
- Touch to access sub-menus
or confirm selection
Return
Lock
System Mode
- Heat/Off
Actual room
temperature
Setpoint
temperature
Receiver module
communication
Current time
5
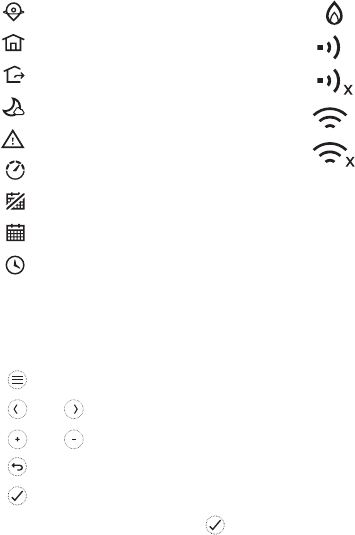
Quick reference to the icons
Navigating the menu
Geofencing active
Geofencing home active
Geofencing away active
Geofencing sleep active
Failure/Alarm
Optimisation active
Schedule disabled
Schedule enabled
Temporary Hold active
Heating demand active
Receiver module communication
Communication failure
Wi-Fi communication
Wi-Fi failure
(MENU): Touch to access all menu items and configurable options.
and (ARROWS): Touch to navigate the menu, sub-menus and options.
and (PLUS/MINUS): Touch to change settings (temperature, date)
(RETURN): Touch to or go back to previous menu.
(SELECT/CONFIRM): Touch to confirm selection, or access a sub-menu.
Note: In addition to touching (SELECT), a sub-menu can be accessed
by touching the text in the message area (for example, SCHEDULE).
6
Main menu
The main menu lets you customise how the Thermostat displays information or responds
to certain situations. The menus are:
SCHEDULE
View or edit the schedule
WI-FI
Setup or change WiFi settings
CLEAN SCREEN
Disables screen for 30 seconds
in order to clean it
LOCK
Restricts access to thermostat interface
LANGUAGE
Change the language
CLOCK
Set the time and date
IDLE BRIGHTNESS
Set the backlight brightness
for the idle screen
SCHEDULE OPTIONS
Select the type of schedule to run
OPTIMISE
Configure optimisation settings
(start/stop/delay)
TEMPERATURE OFFSET
Offsets the measured temperature
RESET
Reset the schedule, WiFi or Homekit
to factory default settings
DEVICE INFO
Device information like
model, MAC code, etc.

7
Connecting to a WiFi
®
network
Before continuing you should:
• Ensure your WiFi is secure and set to 2.4GHz.
• Have a note of your home WiFi network name and password.
• Switch on your smartphone or tablet WiFi.
Once connected to your WiFi network and Honeywell Home App, the Thermostat will briefly
display SUCCESs and the connected symbol
will be displayed in the upper right corner. The
Thermostat will also set the time and date automatically once connected to the internet.
Disconnect or reconnect to a WiFi network
If you need to disconnect the Thermostat from your WiFi network (for example, you’re replacing
your router), or if you need to reconnect to another WiFi network, follow the instructions
described in the Honeywell Home App under the menu ‘Thermostat Configuration’.
1 Download and install the
Honeywell Home App from the
Google Play or Apple App Store.
2 Open the Honeywell Home App,
press “Create Account” and
follow the App instructions.
To connect your thermostat to your WiFi network and register:
Honeywell Home
Create Account
Login
8
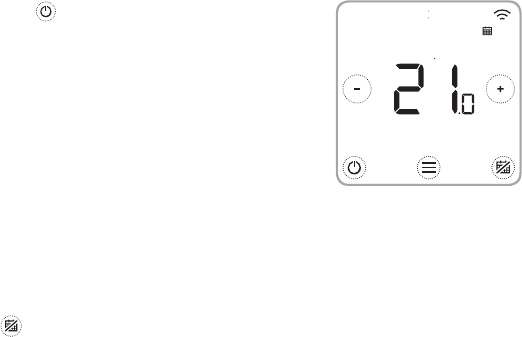
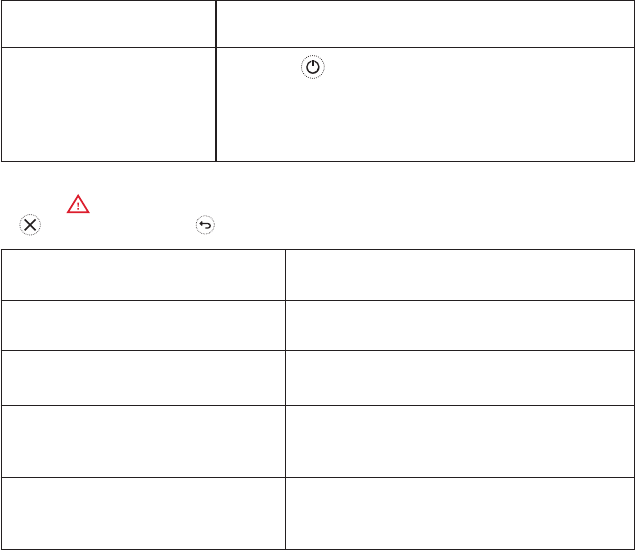
Setting the system mode
• When the button is touched, the Thermostat
toggles the system Heating or Off.
• The available modes are:
- Heating On: Controls the heating
system to achieve desired temperature.
- Off
Your Thermostat can switch heating equipment on or off, to effectively manage your
comfort depending on the indoor condition and your preferred temperature.
Turn the heating schedule On/Off
Your Thermostat is a programmable thermostat with a schedule, but the schedule can also
be turned off.
• Touch
to deactivate or activate the Heating schedule.
Schedule options
Your T6/T6R Smart Thermostat has three schedule types:
• Daily (7- day) : Individual program for each day of the week.
• Week + Weekend : Individual program for weekdays and weekend.
• Geofence : Location based temperature control.
Can only be enabled and configured using the Honeywell Home App.
1004
210
9
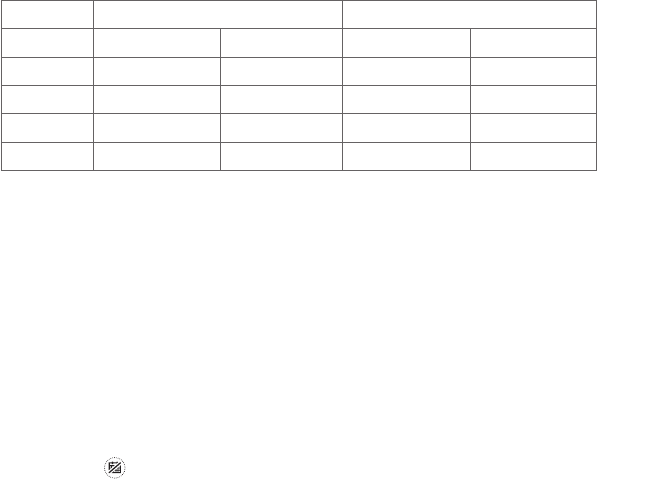
Preset energy-saving schedules
Your T6/T6R Thermostat comes with the following default schedule. To change
these settings go to ‘Adjusting program schedules’ on the next page.
MonFri Sat + Sun
Period Time Temperature Time Temperature
1 6:30 - 8:00 19 °C 8:00 - 10:00 19 °C
2 8:00 - 18:00 16 °C 10:00 - 17:00 16 °C
5 18:00 - 22:30 21 °C 17:00 - 23:00 21 °C
6 22:30 - 6:30 16 °C 23:00 - 8:00 16 °C
For more scheduling options, go to your Honeywell Home App.
Setting the holiday mode
This feature helps you save energy while you are away for longer periods,
and restores comfortable settings just before you return home.
• To activate your holiday period, in your Honeywell Home App go to
Menu/Setting/Holiday
• HOLIDAY is indicated on the Thermostat.
• You can cancel Holiday Mode either on the Thermostat
or in the Honeywell Home App.
Touch
on your Thermostat home screen to
resume the regular program schedule.
10
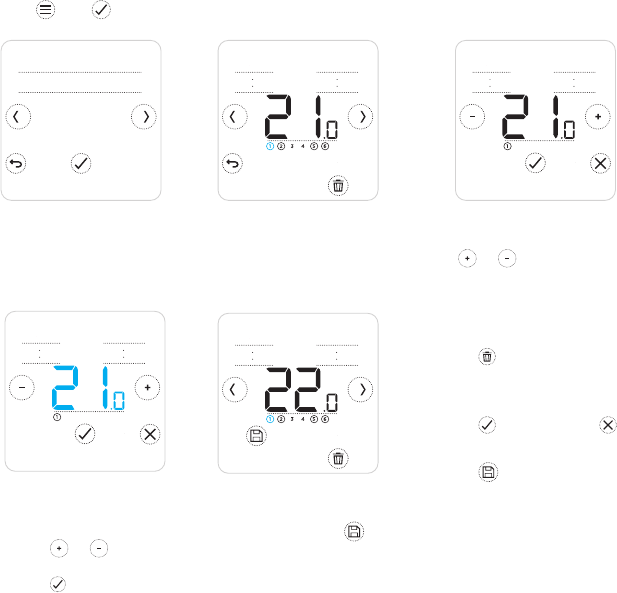
Adjusting a program schedule
1. Use and to go to SCHEDULE
Delete a period
Touch to delete the
selected period. The
screen will read DELETE.
Touch
to confirm or
to cancel without deleting.
Touch
to save the
schedule changes.
SCHED
***MON-FRI**
1040*TO∂1500
MO-FR
1040*TO∂1500
MO-FR
1050*TO∂1500
MO-FR
1050*TO∂1500
MO-FR
2. Select day(s) to
be adjusted.
3. Select time period to be
adjusted. The selected
period flashes.
4. Touch time that needs
to be changed. Touch
or to change it.
Repeat with other time.
5. Touch the period’s
temperature to change it.
It will start flashing.
Touch
or to
adjust the temperature.
Touch
to confirm
the changes.
6. When you have
finished adjusting the
schedule, touch
to save the changes.

11
1. Touch or to
adjust temperature.
Overriding a program schedule
You can override the program schedule in two different ways:
1. Temporary override “Hold Until”
2. Permanent override “Permanent Hold”
Hold Until
• The schedule will
resume when
the Hold Until
time expires.
• Touch
to cancel
the Hold Until
and resume the
regular schedule.
1050 TO 1030
930
195
930
210
1050 TO 1030
1004
195
2. During temperature
adjustment, the
Until time appears.
930
1050 TO 1100
3. Touch the time to
changes it and use
or to adjust.
4.
indicates Hold
Until is active.
12
Overriding a program schedule (continued)
Permanent Hold
1. Touch to deactive the schedule
and activate a permanent hold.
2. Touch
or to adjust temperature.
3. Touch to cancel the Permanent Hold
and resume the regular schedule.
210
1004
Geofencing
Your new T6/T6R Smart Thermostat supports location-based scheduling
which can intelligently override the time-based schedule. If your schedule
varies or you regularly depart and return at different times, the Thermostat
can automatically adjust to your life. No rigid scheduling. No learning period.
Just comfort when you’re home and savings when you’re away.
When you enable the geofence schedule in the Honeywell Home App, it
intelligently controls your heating based on whether you are home or away.
• Active geofence schedule is indicated by
in the top left corner of the
screen. Home/Away/Sleep status is indicated by
, or .
• To learn more about configuring the geofence schedule, see
‘Create New Schedule’ menu in your Honeywell Home App.
•
To learn more about how smart geofencing can work for you and how
it fits to your busy lifestyle, go to getconnected.honeywellhome.com

13
Heating optimisation functions
Your T6/T6R Smart Thermostat has several heating optimisation functions. These
functions aim to save energy while making you as comfortable as possible.
Configure these options via the OPTIMISE menu on your Thermostat.
• Optimum Start
Over time, the Thermostat learns how long it takes your system to
reach the temperature you want. It turns on the heating or cooling
system earlier to make sure you’re comfortable at the time you expect.
The Thermostat displays
when it turns the system on early.
• Optimum Stop
Saves energy and money by switching off a little bit earlier than the normal
programmed time. If your home is up to temperature, you will not notice the
effect on the temperature, but you will see a difference in your fuel bill.
• Delayed Start
Saves energy by slightly delaying the start of heating depending on the difference
between the programmed temperature and the actual room temperature.
Locking the interface
Your T6/T6R Smart Thermostat has a lock function, which can
restrict access to the Thermostat interface in two levels:
• PARTIAL: Allows changing the setpoint temperature only
• FULL: Restricts all access to the Thermostat interface
When the function is activated a PIN is given to unlock
the thermostat - take note of the PIN.
14
Troubleshooting
If you have difficulty with your Thermostat, try these suggestions.
Most problems can be corrected quickly and easily.
Screen is blank
• Make sure power is switched on.
• Check circuit breaker and reset if necessary.
Heating system does not
respond
• Touch to set system to Heat. Make sure the set
temperature is higher than the actual temperature.
• Check the circuit breaker and reset if necessary.
• Check the heating system is powered on.
• Check the Receiver Box is working.
List of alerts:
Touch
to dismiss the alert. To snooze the alert for 7 days
WIFI RADIO ERROR
The WiFi radio of your Thermostat is faulty,
contact your installer.
INTERNAL MEMORY ERROR
The internal memory of your Thermostat is
faulty, contact your installer.
THERMOSTAT TEMPERATURE
SENSOR ERROR
The temperature sensor of your Thermostat
is faulty, contact your installer.
INDOOR TEMPERATURE SENSOR
ERROR
(T6 only) The remote indoor temperature
sensor is not connected or the wiring is
faulty, contact your installer.
OUTDOOR TEMPERATURE SENSOR
ERROR
(T6 only) The remote outdoor temperature
sensor is not connected or the wiring
is faulty, contact your installer.

15
Troubleshooting
List of alerts (continued):
REGISTER ONLINE
Please download the App, create an
account and register your Thermostat.
NO INTERNET
The internet connection has been lost, please
check your internet connection or WiFi router.
NO WIFI SIGNAL
The WiFi signal has been lost, please
check your WiFi router.
WIFI NOT CONFIGURED
Please download the App, create an
account and add your Thermostat.
See also page 7.
NO RECEIVER BOX
BINDING
There is no Receiver box binding data
stored, contact your installer.
NO COMMUNICATION
RECEIVER BOX
There is no communication with the Receiver box,
move Thermostat closer or contact your installer.
RF SIGNAL OFRECEIVER
BOX LOW
There is a weak radio signal from the Receiver box,
move Thermostat closer or contact your installer.
BOILER FAULT XX
The boiler reported a failure number
XX, contact your installer.
BOILER HAS LOW WATER
PRESSURE
The boiler reported low water pressure, top
up the system or contact your installer.

For help:
200 Berkshire Place
Winnersh Triangle, Berkshire RG41 5R
Phone: 0300 130 1299
© 2020 Resideo Technologies, Inc. All rights reserved. The
Honeywell Home trademark is used under license from
Honeywell International Inc.
This product is manufactured by Resideo and its affiliates.
Printed in the EU
Use of the Works with Apple HomeKit logo means that an
electronic accessory has been designed to connect specifically
to iPod, iPhone, or iPad, respectively, and has been certified
by the developer to meet Apple per
formance standards.
Apple is not responsible for the operation of this device or
its compliance with safety and regulatory standards.
WiFi
®
is a registered trademark of WiFi Alliance
®
32317085020 C
getconnected.honeywellhome.com
Pittway Sarl Z.A. La Pièce 4,
1180 Rolle, Switzerland
T6
SMART THERMOSTAT
T6R
SMART THERMOSTAT
(WIRELESS)
Leak detectorSecurityThermostat
C2 WI-FI
SECURITY CAMERA
W1 WI-FI
WATER LEAK AND
FREEZE DETECTOR
